Saturday, May 27, 2023

4th of July Bouquet

 Hello Friends,

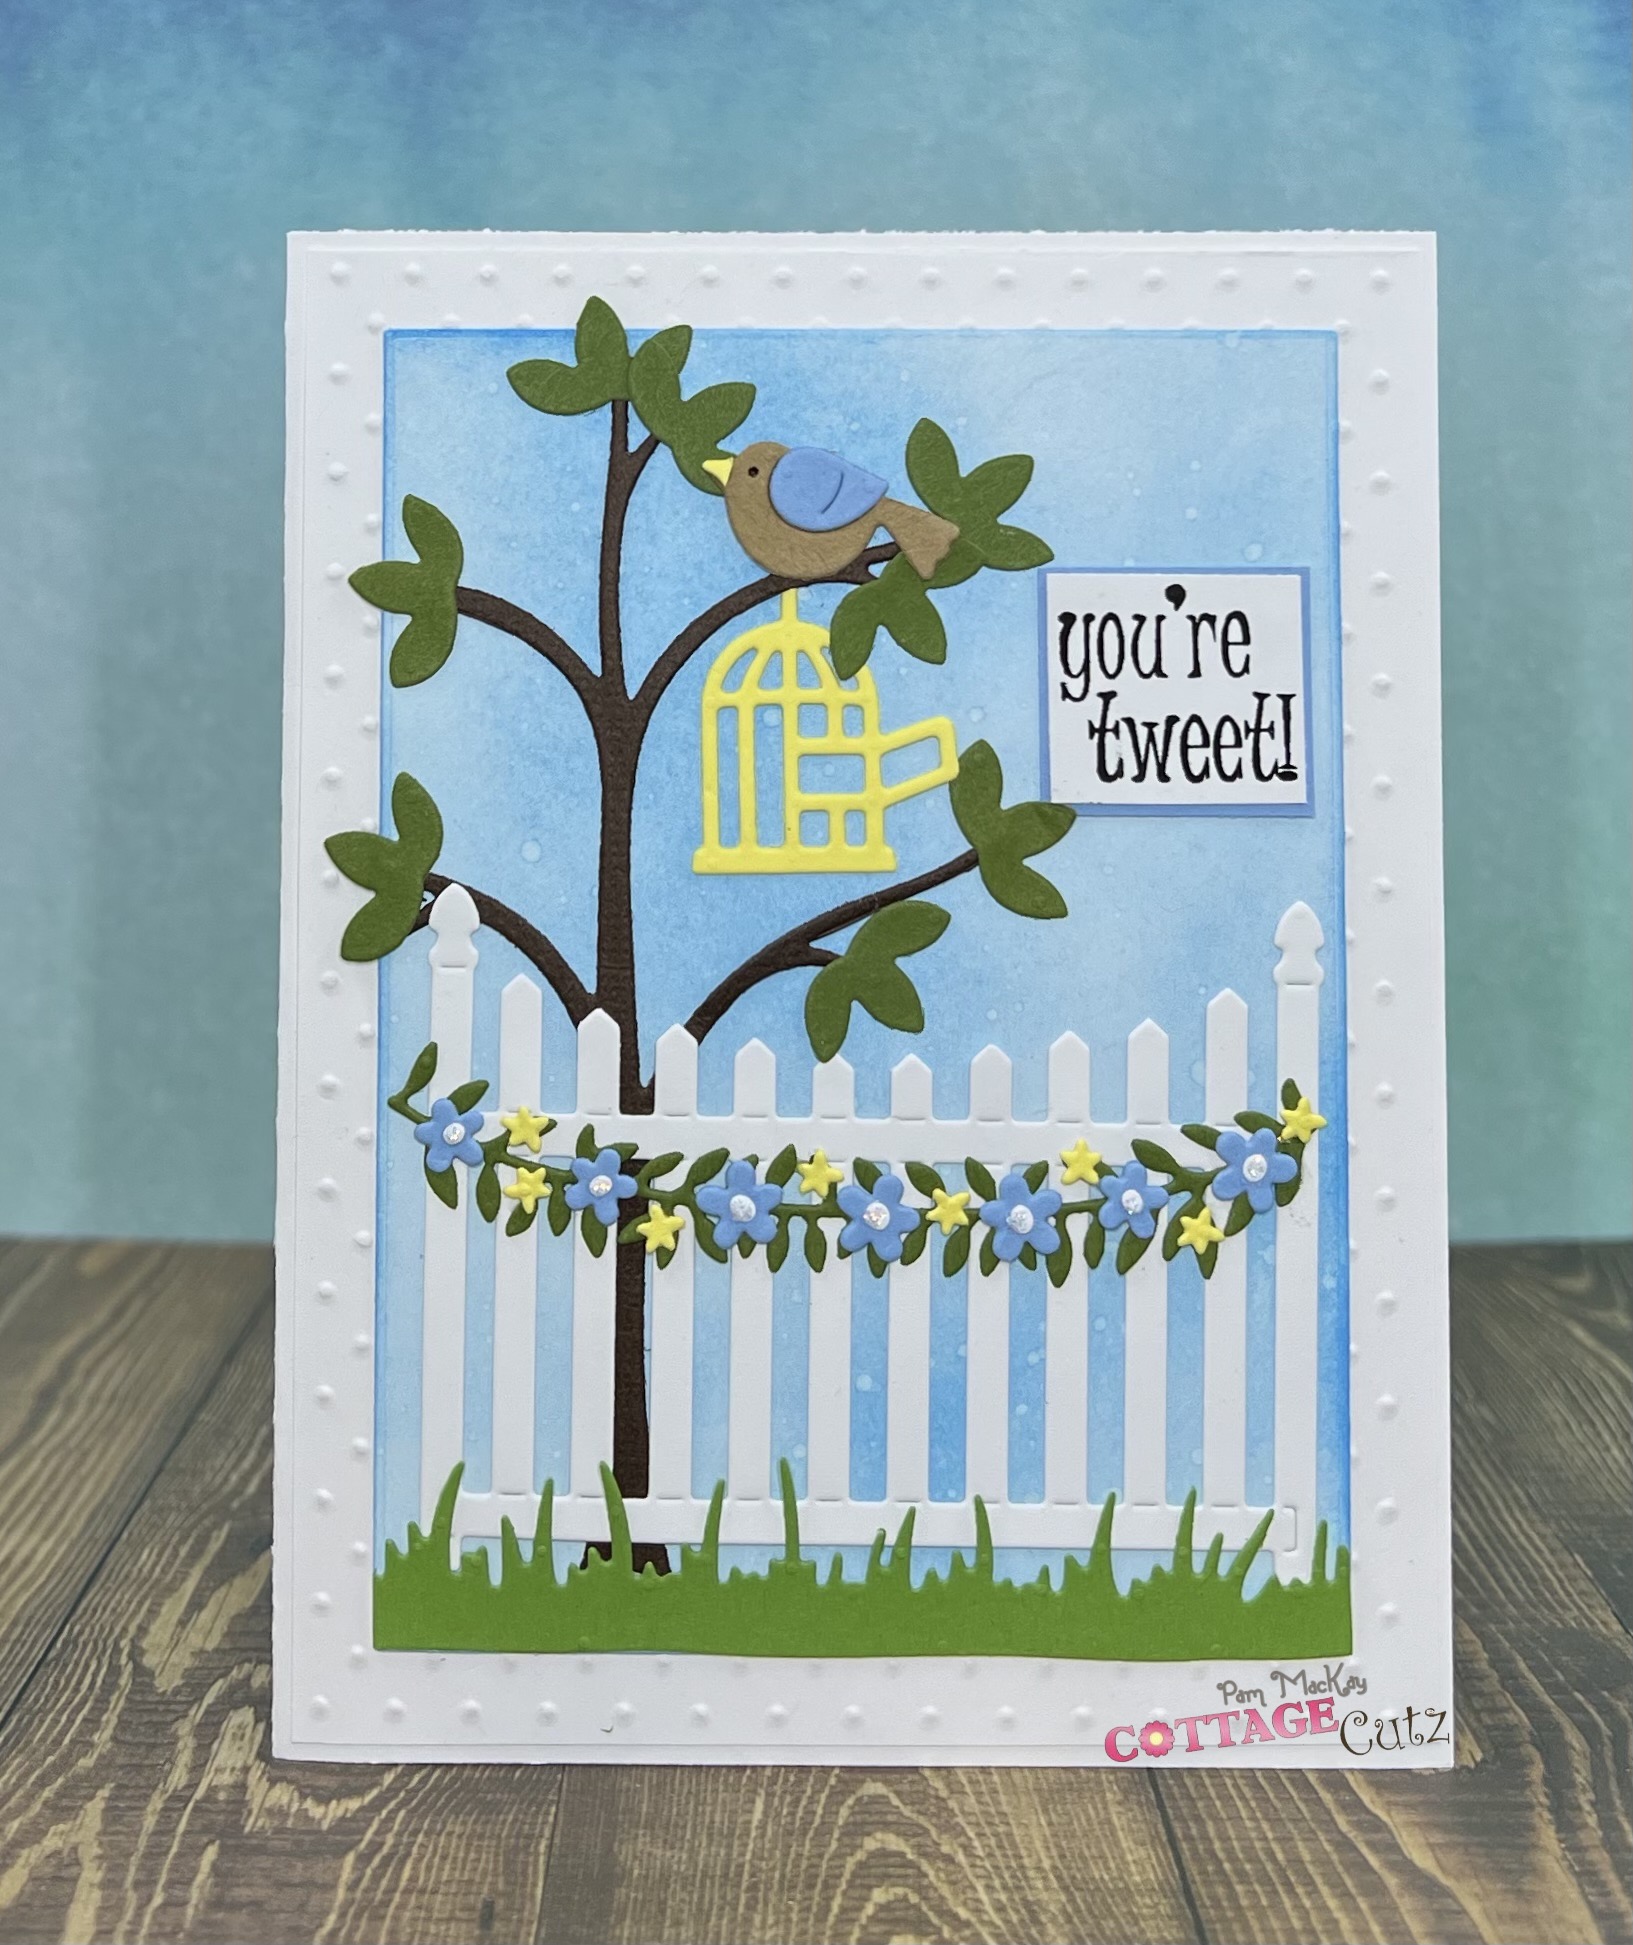
I am working on another card for July!!  And I especially like how this die worked with the pattern paper I chose.  I used one of the dies from the recently released Easter Collection.  The die is Spring Potted Flower w/Bird.  I also decided to do a fancy fold that I have never done before.


Design Steps:

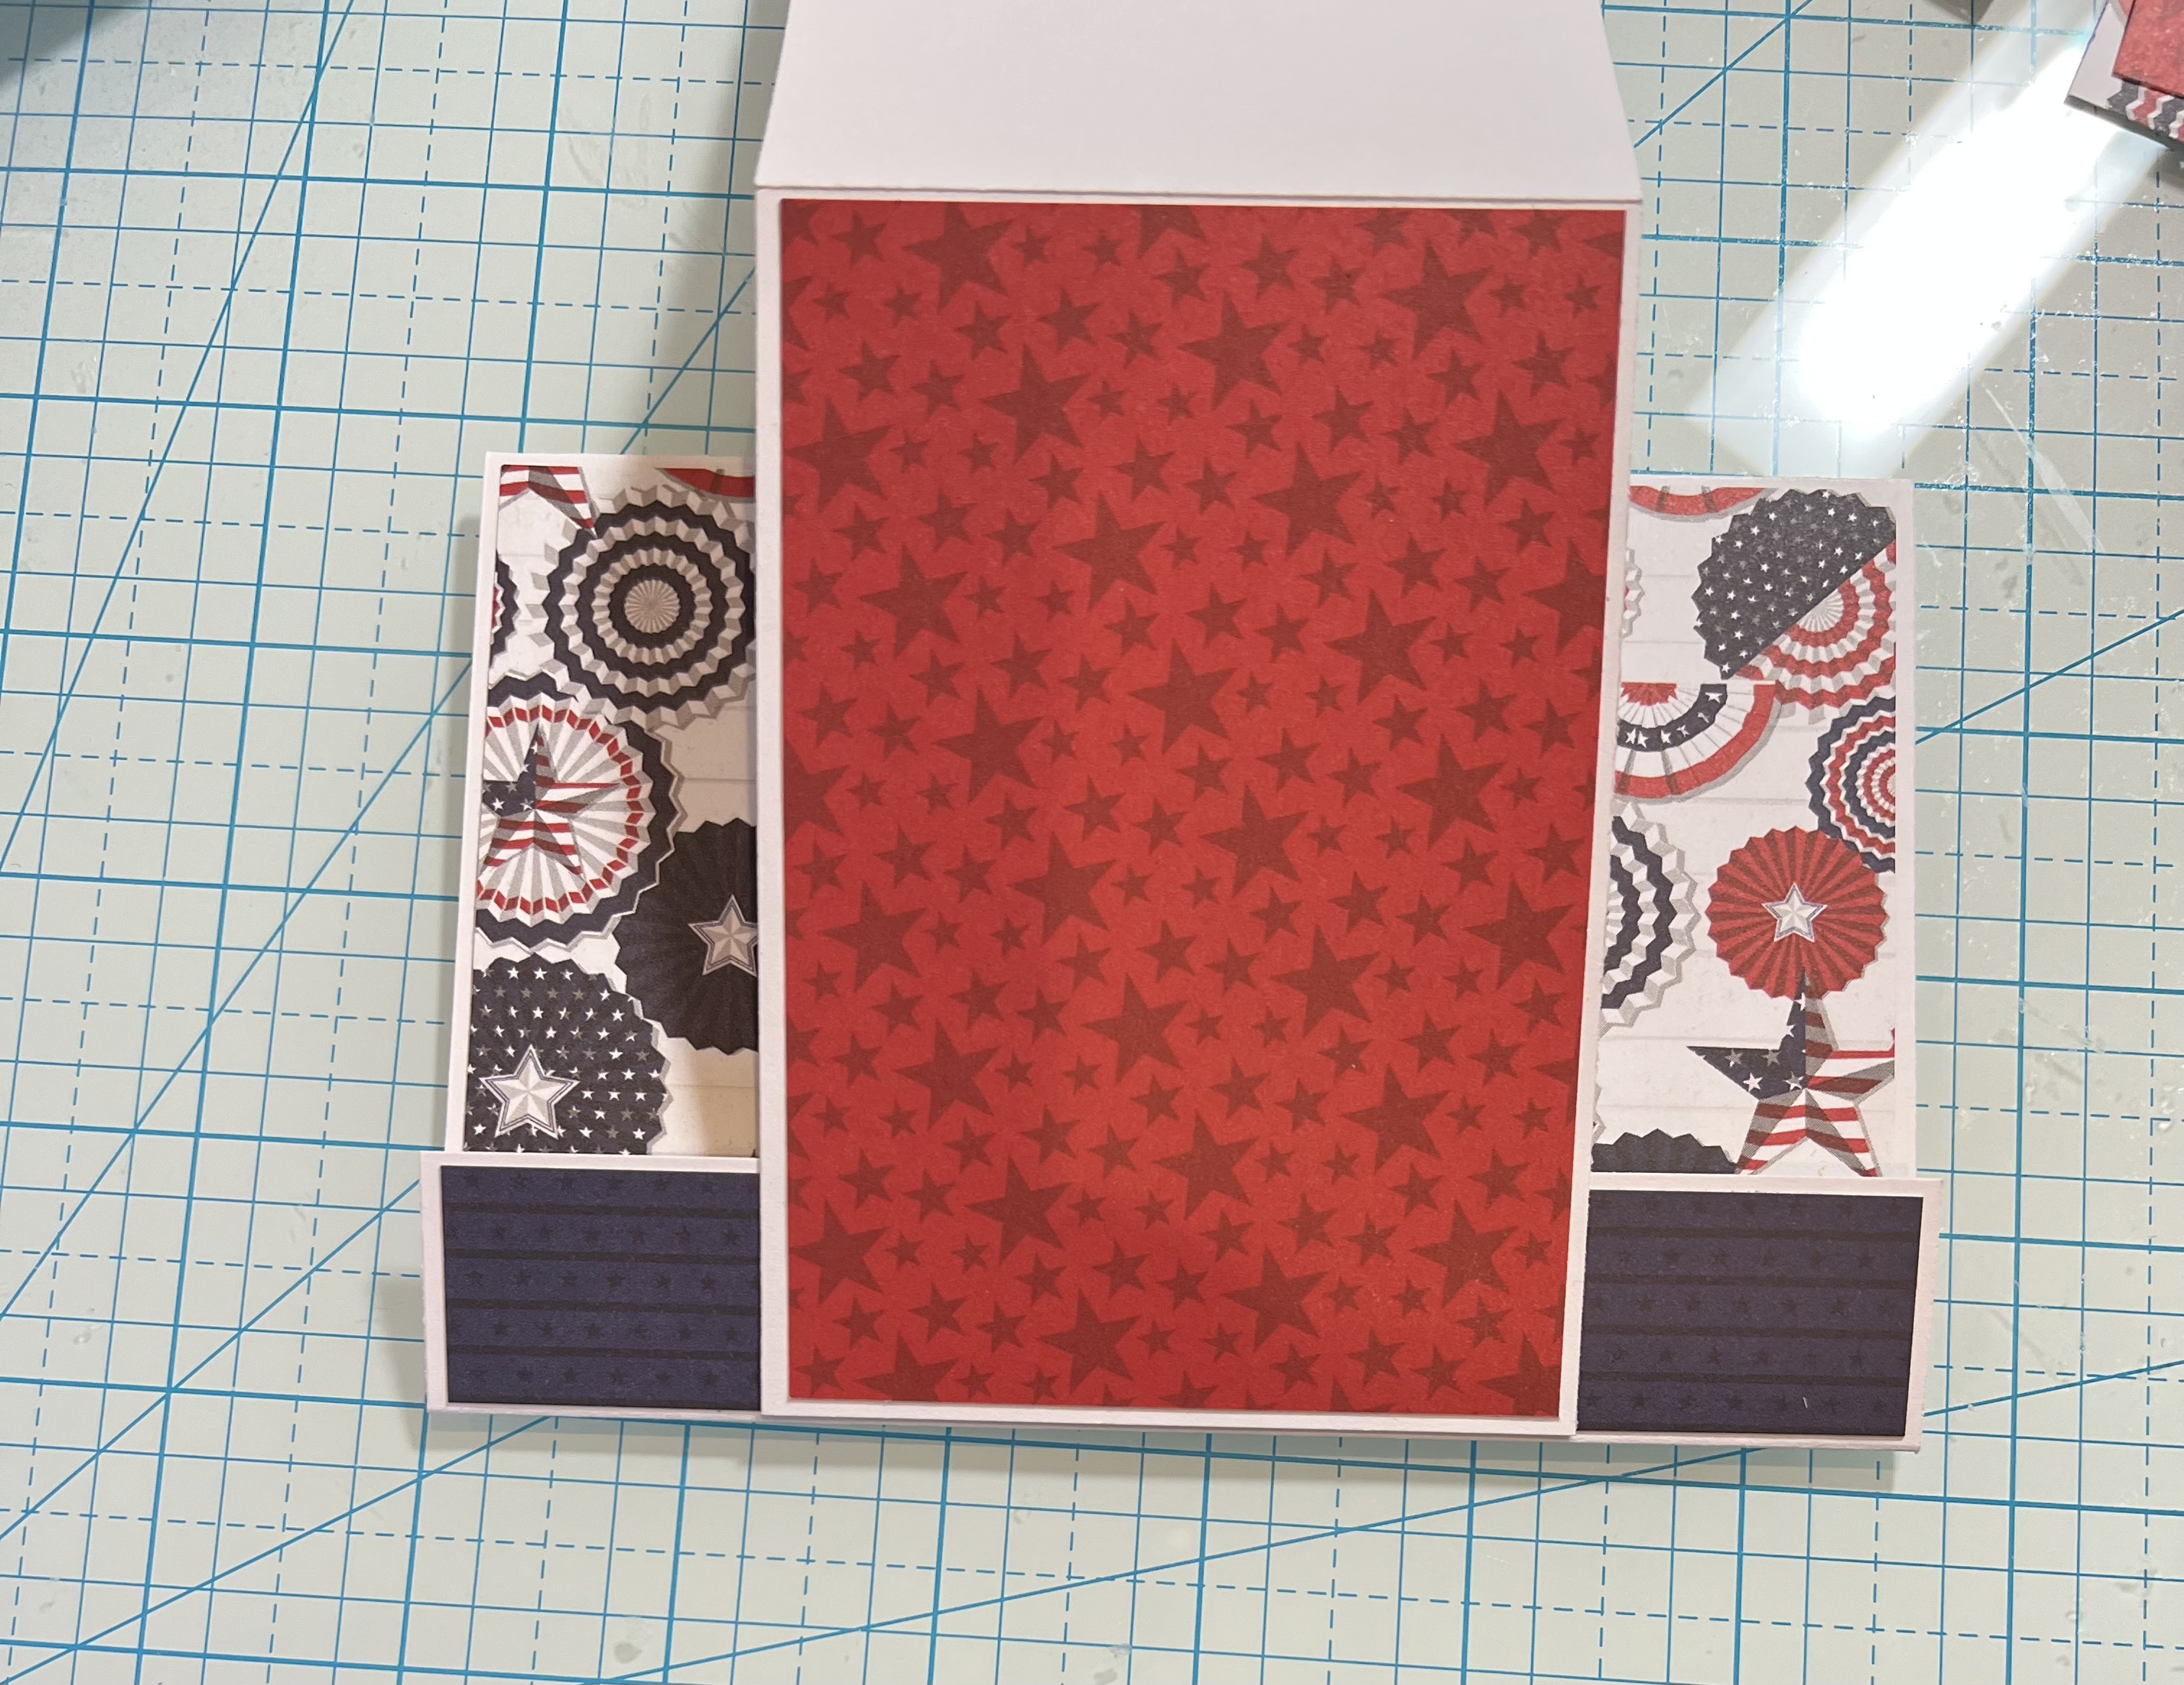
1.  Use a piece of white card stock 8 1/2 x 5 1/2 and score it on the horizontal side at 1 and then at 4 3/4
2.  Fold the card on the 4 3/4 score mountain style and on the 1 inch score the valley style as show above
3.  Next cut a piece of white card stock 3 x 8 1/2 and then fold in half

4.  Cut some designer paper to cover the card: For the front cut a piece 3 5/8 x 5 3/8 (this is the rosette DP)  For the front strip cut a piece 5 3/8 x 7/8 (this is the navy DP).  Last for the separate little card front cut a piece 4 1/8 x 2 7/8 (red star DP)
5.  Glue the navy DP on the front flap and then glue the rosette DP on the card front
6.  On the small card glue the red star paper to the front
7.  Put glue only on the bottom of the small red card and glue it to the navy front flap
8.  Turn the card over and place glue only on the bottom of the small card and glue it to the bottom of the larger white card
9.  Using the Spring Potted Flower w/Bird cut out 5 white flowers, 5 red centers, 2 leaf stems and 4 single leaves in green.  Cut out the pot in the navy DP.  Arrange your potted flowers and glue together
10.  Place dimension dots on the back of the flower pot and stamp your sentiment.  Pop the flowers to the front of the card as shown below.  And then glue your sentiment above the flowers and your card is complete

CottageCutz Products


We have more inspiration on our YouTube Channel check it out HERE

Thanks so much for stopping by!  And I will see you next Thursday.

Blessings and Take Care


Saturday, May 20, 2023

You're Tweet

 Hello Friends

I am making a few thank you cards for my stash.  I am also making some for our little sale at church.  It helps pay for our teens to be able to go to summer camp.  The die I am using is the Fence w/ Flower Garland from the Flowers and More release.  Also used on this card is an oldie Tree of Nature.


Design Steps:

1.  Using the Fence w/Flower Garland cut out white, green, yellow and blue card stock.  Using the Tree of Nature die cut out brown, green, blue (bird), yellow(cage) and light brown(bird).  Using the Spring Grass die cut out green card stock.  Assemble with a fine tip glue
2.  Cut a piece of white card stock 3 1/2 x 4 3/4.  Blend blue ink onto the card stock and then splatter with water
3.  Begin to assemble the card starting with the grass making sure to only put glue at the very bottom of the grass so you can tuck in the tree and then the fence
4.  Add the leaves, birdcage and bird to the tree
5.  Stamp your sentiment in black in to the right of the tree.  (I decided I didn't like the way it looked so I stamped the sentiment on white and layered it with the blue). Use a A2 white card base and a 4 1/8 x 5 3/8 piece of embossed white card stock.  Glue your embossed piece to the card base and then glue the blue panel to the white embossed piece


6.  When I have left over scraps from the card I like to use them inside of the card.  It is a really good way to use them up along with any extra dies that didn't get put on the front of the card


CottageCutz Products


We have more inspiration on our YouTube Channel check it out HERE

Thanks so much for stopping by!  And I will see you next Thursday.

Blessings and Take Care


Wednesday, May 17, 2023

Summer and Baseball

 Hello Friends

Today's post is for the House-Mouse Monday Challenge!  The challenge is Anything Goes or Here Comes Summer.  You can find this challenge HERE!  I decided to do Here Comes Summer with a baseball themed card.


This is such a perfect challenge for using those wonderful House-Mouse Stamps!   Come and join the fun!


Thanks for taking a peek!

Blessings
Pam


Sunday, May 14, 2023

Relax

Hello Friends

It is so much fun when you get to see friends retire.  It start a whole new chapter in life.  When I retired it lead to many new adventures! A move from California to South Carolina and then back to Arizona.  We have explored many interesting places in Arizona so maybe it time to try out another state!  We have lived in Ohio, Washington, Oregon, California, South Carolina and Arizona!!  What state is next??

Here is the retirement card I made using the new release die Pond w/Cattails.  I also used some of our slimline dies for the background.


Design Steps:

1.  For the background I used an embossing folder and then I lightly inked it with a brayer
2.  Using the the Mountain & Tree and Grass Slimline dies cut out brown, white, dark green and light green card stock.  The mountain is about 2 1/2 inches tall, the trees are 2 inches tall and the grass is 2 1/4 inches tall

3.  Glue the mountains to the blue sky card stock about 1 1/4 inches from the top.  Next glue down the trees as shown followed by the grass
4.  Using the Pond w/Cattails & Lily Pad die cut out the follower card stock: blue, green, gray and brown.  Shade the pieces with coordinating inks.  Assemble with a fine tip glue
5.  Use a Kraft card stock A2 base and glue the blue sky panel to the card front.  Add the sentiment and your card is complete

CottageCutz Supplies


We have more inspiration on our YouTube Channel check it out HERE

Thanks so much for stopping by!  And I will see you next Thursday.

Blessings and Take Care


Saturday, May 6, 2023

Happy 4th

Hello Friends,

I know it is a little early for July cards but time seems to be going so fast!!  I love to send our 4th of July cards.  And I especially like to work with red, white and blue!  I used two dies from the recently released Easter Collection.  The dies are Spring Bunny Car and Spring Party Car.  

Design Steps:

1.  Use the Spring Party Car, Spring Bunny Car and the Lemonade Stand (for the banner) and cut out the following colors of card stock: red, white, silver, black and blue

2.  Assemble the cars with a fine tip, fast drying,  clear glue
3.  The Slimline card base is navy card stock measuring 8 1/4 x 3 1/4.  Using the Slimline Windows die cut out white card stock.  Glue DP behind the windows as shown
4.  Glue the Windows to the navy slimline card base
5.  Place dimension squares to the back of the cars and balloons.  Pop them onto the card base add a few star cutouts and star rhinestones and it is complete


CottageCutz Products


We have more inspiration on our YouTube Channel check it out HERE

Thanks so much for stopping by!  And I will see you next Thursday.

Blessings and Take Care