Sunday, April 30, 2023

A Little Birdie Told Me

 Hello Friends,

It is Pam creating with you today!   We have a giant Anniversary Sale going on in the store.  Some of the items are up to 75% off!!  Check it out HERE.  The sale ends May 5th so don't miss out!

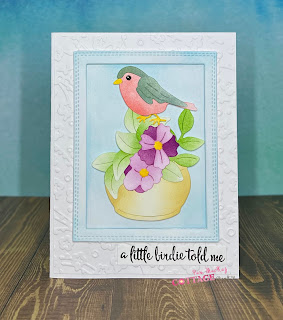
The Birds in this Easter collection are so versatile and beautiful.  They would be perfect for a mother's day card, thank you, sympathy or just about anything! I am using the Spring Potted Flower w/Bird for my Birthday card.

Design Steps:

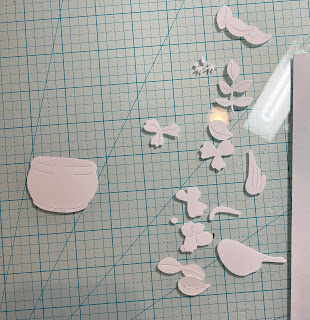
1.  Using the Spring Potted Flower w/Bird cut out all the pieces in white card stock
2.  Using a variety of ink colors shade in all the pieces
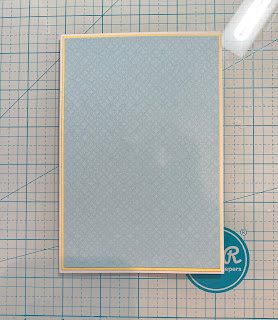
3.  To create the frame I used the largest Double Stitched Rectangle and taped the second largest Rectangle  die in the center.  Run it through your machine twice for two frames.  Glue the frames together and also glue the inside of the frame pieces together.  Use a blue ink and blend the frames and the inside of the frames
4.  The card base is white A2 card stock.  Cut a piece of white 4 1/8 x 5 3/8 and then run through an embossing folder.  Glue the embossed piece to the card front.  Place dimension tape around the frame and place it just slightly above center
5.  Pop in the blue inside of the frame and then assemble your bird as shown.  I did use dimension dots on the pot and bird.  Add the sentiment and your card is complete

CottageCutz Products


We have more inspiration on our YouTube Channel check it out HERE

Thanks so much for stopping by!  And I will see you next Thursday.

Blessings and Take Care


Thursday, April 27, 2023

You & Me

 Hello Friends

Today's post is for the House-Mouse Monday Challenge!  The challenge is Anything Goes or Water.  You can find this challenge HERE!  I decided to do Water!


This is such a perfect challenge for using those wonderful House-Mouse Stamps!   Come and join the fun!


Thanks for taking a peek!

Blessings
Pam

Sunday, April 23, 2023

Froggie Birthday Wishes

   Hello Friends,

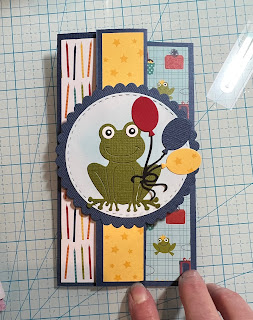
I have a few younger relatives so I thought I would make a card for one of those special kids! I am using two of the new dies and a fun fold.  The fun fold is from a YouTube video I saw by Karen Aicken.  The dies are Spring Frog w/Mushroom and Spring Party Car.

Design Steps:

1.  Cut a piece of navy card stock 7 x 6 1/4
  • Score along the 7 inch side at 1 1/4 and 3 1/2 
  • Valley fold the card at the 3 1/2 inch score and then mountain fold at the 1 1/4 inch score as shown above
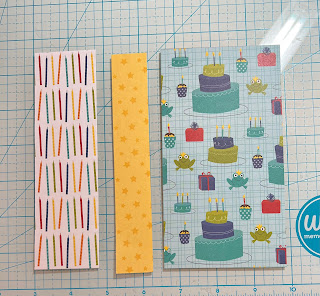
2.  Cut the candle DP at 1 3/4 x 6
  • Yellow Star DP at 1 x 6
  • Birthday cake DP at 3 1/4 x 6
3.  Glue the yellow star DP to the fold as shown and the cake DP to the inside of the card as shown
4.  Flip the card over and glue the candle DP to the front of the card as shown.  Add dimension dots to the flap and then close the flap
5.  Cut 2 piece of white card stock with the second from the largest stitched die and one navy circle with the largest scallop die
6.  Using the Spring Frog w/Mushrooms cut out the frog in green, white and black.  Using the Spring Party Car cut out the pieces in red, yellow star DP, navy and black.  Assemble the pieces and ink the white circles with blue
7.  Attach the circle with glue and a dimension dot on the left side
8.  Stamp your sentiment for the front and layer onto navy card stock.  Stamp the sentiment for the inside of the card
9.  Glue down the frog ( I cut the front leg to slip on the balloons)

10.  Glue the inside cricle directly behind the front circle.  Add the sentiment on the front and your card is complete


We have more inspiration on our YouTube Channel check it out HERE

Thanks so much for stopping by!  And I will see you next Thursday.

Blessings and Take Care


Tuesday, April 18, 2023

Thank You Tulips

 Hello Friends,

It is Pam creating with you today!   

The flowers in this Easter collection are so versatile and gorgeous.  They would be perfect for a mother's day card, thank you, sympathy or just about anything! I am using the Spring Tulips for my Thank You card.


  Design Steps:

1.  Use a cream A2 size base, cut a piece of cream 4 x 5 1/4 you can use a cover plate or embosing folder for the background.  Use the Spring Tulips die and cut the tulips and leaves out of white card stock
2.  Use 2 shades of orange and yellow to ink up the tulips.  Use two shades of green to ink up the leaves and stems.  Assemble the flowers with a fine tip glue
3.  Use the Slimline Picket Fence die and cut it out of white.  Then glue it to the textured piece of cream.  Next use the Spring Grass die and cut it out of white twice.  Ink the grass with the same inks as the leaves.  Glue down the grass and then add the flowers
4.  Use the Expressions Thanks and cut it twice out of white and then ink with orange.  Glue the thanks to the upper right side of the card as shown and your card is complete

CottageCutz Products


We have more inspiration on our YouTube Channel check it out HERE

Thanks so much for stopping by!  And I will see you next Thursday.

Blessings and Take Care


Monday, April 10, 2023

Butterfly Sympathy Cards

  Hello Friends!

It is NEW RELEASE TIME!  The collection is called EASTER and it has 17 incredible pieces!  They are so perfect for Easter and Spring.   Right now you can save up to 30% on these individual dies. This sale will not last so stop by the store today right HERE

Sympathy cards are always difficult to make especially when the death is close to your heart.  So I decided to make a couple just to have in my stash. I used the Spring Butterflies


Designer Steps:
1.  Using the Spring Butterflies die cut out two on black card stock and set aside
2.  Cut a 4 x 5 1/4 piece of heavy white card stock.  Use red and yellow inks to blend along the top, bottom and left side of the card (as shown above)
3.  Give the ink time to dry and then stamp the sentiment on the right side of the card in black ink
4.  To add texture use a stencil and some white embossing paste.  Place the stencil over the inked white card stock and apply the paste.  Give the paste time to dry
5.  For the card use a yellow A2 base.  Cut a piece of black 5 3/8 x 4 1/8 and glue it to the yellow card base.  The final step is to glue the inked panel to the black card stock and add the butterflies.  Your card is complete

CottageCutz Product

I think this is one of our most beautiful collection so don't miss out!  I think it will sell out fast!


We have more inspiration on our YouTube Channel check it out HERE

Thanks so much for stopping by!  And I will see you next Thursday.

Blessings and Take Care


Saturday, April 1, 2023

Easter Lilies

 Hello Friends!

It is NEW RELEASE TIME!  The collection is called EASTER and it has 17 incredible pieces!  They are so perfect for Easter and Spring.   Right now you can save up to 30% on these individual dies. This sale will not last so stop by the store today right HERE

I think the flowers in this release are beyond beautiful.  So I decided to feature the Spring Lilies on this card.

Designer Steps:
1.  Using the Spring Lilies die cut out the pieces in white card stock.  Use green ink and a small applicator to shade the inside of the flower and the stems.  Use Copic markers to add additional shading and soft yellow and brown details.  Glue the pieces together with a fine tip glue
2.  Using the Oval Doily & Frame die cut it out of yellow card stock.  Arrange the flowers onto the yellow oval
3.  The card base is white measuring 6 1/4 x 4 1/4
  • Cut a piece of yellow card stock 6 1/8 x 4 1/8
  • Cut a piece of blue DP 6 x 4
4.  Glue the yellow card stock to the white card base adhere the blue DP the yellow card stock
5.  Glue the oval with the lilies to the card slightly above center
6.  Add the bow to the base of the flowers and then add the stamped sentiment

CottageCutz Products

I think this is one of our most beautiful collection so don't miss out!  I think it will sell out fast!


We have more inspiration on our YouTube Channel check it out HERE

Thanks so much for stopping by!  And I will see you next Thursday.

Blessings and Take Care