Sunday, June 27, 2021

Birthday Cow

Hello Scrapping Cottage Friends 

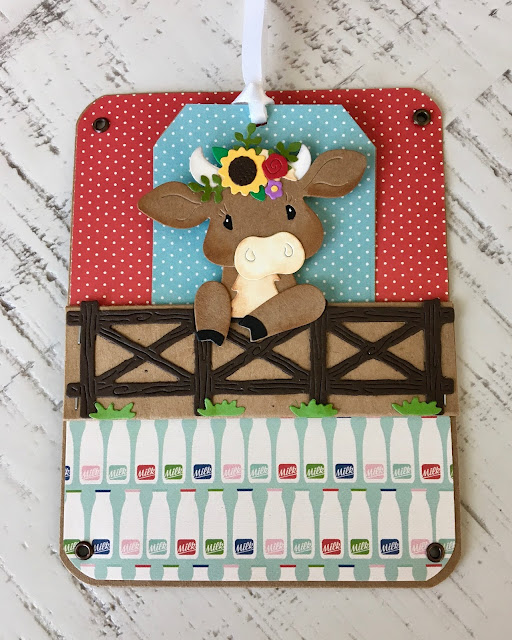
Our design team is continuing to fashion some ideas for you to use from the new collection called COUNTRY FARM! It has the so many incredible dies.  Everything from Tractors to Cowboy Chicks!  Each die is just full of awesome details and can be used for so many different occasions.  Today, I am using the Farm Cow Peeker.  This little cow has to be the cutest cow I have ever seen!  I think it makes a great pocket card for a tucked in tag and gift card.


Designer Steps:

1.  Use a 4 1/4 x 11 in card base scored at 1 1/4, 2 1/2, and 5 1/2
2.  Cut a piece of red dotted DP 4 1/8 x 5 and a piece of milk bottle DP 4 1/8 x 2.  Fold the card in half and then fold the top scores valley then valley again
3.  Glue the red dotted DP to the front inside of the card.  Fold the bottom flap up and the glue the milk bottle DP to the bottom flap as shown.  Staple the fold twice on each side.  I used my TH tiny stapler and round the corners. 
4.  Using the Country Farm Cows die cut out two pieces of dark brown fence and glue them to the flap as shown.  I also cut out 4 pieces of the grass clumps in green
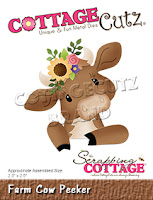
5.  Using the Farm Cow Peeker cut out all the pieces shade and assemble
6.  Cut out 2 tags 5 x 2 1/2 one in brown and one in blue dotted DP.  Glue them together and punch the hole in the top
7.  Using dimensionals pop up the cow and add your ribbon.  Stamp the bottom of the tag with your sentiment and add a small strip of red dotted DP 1/2 x 2 1/2


CottageCutz Products


As always thanks so much for taking a peek at my card.  I really appreciate it!

Blessings and Take Care

Pam

Tuesday, June 22, 2021

Greetings

Hello Scrapping Cottage Friends 

It is Pam creating with you today!

Our design team is continuing to fashion some ideas for you to use from the new collection called COUNTRY FARM! It has the so many incredible dies.  Everything from Tractors to Cowboy Chicks!  Each die is just full of awesome details and can be used for so many different occasions.  Today, I am using the Farm Truck w/Animals.   I really love this little truck it can be filled with all kinds of fun things.


Design Steps:

1.  Using the Farm Truck w/Animals die cut out the truck pieces: navy, silver, dark brown, black and acetate.  For the animals brown, dark brown, tan, rust, green, red, yellow, black, white
2.  Glue the truck together with a fine tip glue.  Glue the animals together and then glue them into the truck
3.  Use a white A2 Card base, use a 4 x 5 1/4 piece of tractor DP and mat it with the navy blue.  Use a 1 x 5 1/4 piece of checked green DP and mat it with navy blue.  Using the second from the largest Double Stitched Rectangle die cut out a piece of red.  Take the red rectangle and mat it onto navy blue
4.  Wrap the red double stitched rectangle with a piece of brown stitched ribbon as shown.  Next pop up the truck as shown
5.  Glue the navy blue matted farm truck DP to the A2 white card base.  Glue the navy blue matted green checked strip to the front as shown
6.  Glue down the double stitched rectangle with the truck to the card front as shown and add the sentiment which has been stamped and matted onto navy card stock.  Your card is complete!

CottageCutz Products


Thanks so much for stopping by.  I hope this fun little card gives you a boost of inspiration to create your own adorable farm card!

Blessing and Take Care
Pam


Monday, June 21, 2021

Arizona

 Hi Friends


Here are a few more cards inspired by my home state of Arizona!  All the paper used on these two projects are from The Paper Collage!  


I am really enjoying my new home here in Arizona. The natural beauty is breath taking!  There is so much of God's handy work just everywhere you look!

Blessings
Pam

Sunday, June 20, 2021

Southwest

 Hello Friends


Just made two silhouette cards that represent the southwest.  They are both slimline and I just love all the warm colors.  The papers I used for the two cards comes from a store in the Phoenix area called The Paper Collage.  They design all of their own papers so they are very unique and so beautiful.


Thanks so much for stopping by today and I would love to hear from you. Just leave your comment below!

Blessings

Pam

Thursday, June 17, 2021

Baby Cards

 Hi Everyone

I made a few baby card for our local scrapbook store.  They carry the cutest papers.   The store is called The Paper Collage.  Wonderful family run business!!


Thanks for checking out the baby cards!

Blessings

Pam

Tuesday, June 15, 2021

Hay There

  Hello Scrapping Cottage Friends 

IT IS NEW RELEASE TIME! The collection is called COUNTRY FARM! It has the most delightful dies.  Everything from Tractors to Cowboy Chicks!  Each die is just full of awesome details and can be used for so many different occasions.  Today, I am using the Country Farm Stable.  This fun fancy fold hello card will be going to someone that loves horses!


Design steps:

1.  Start with a white piece of card stock 8 1/2 x 5 1/2.  Score at 1 3/8 and 2 1/2.  Flip the card over and repeat the scoring on the other end of the card. Valley fold the first score line and then mountain fold the next two and the final score line is a valley fold as shown above
2.  Using the Country Farm Stable cut out all the pieces with a variety of colors: green, brown, cream, silver, light brown, red, and yellow.  Shade the pieces and glue together using a fine tip glue
3.  For the front of the card cut a piece of cloud DP 3 1/4 x 4 1/4 and a piece of green card stock 3 1/4 x 1 1/2.  Use the Slimline Grass die for the background grass.  Cut a rectangle of brown using the second from  the largest Double Stitched Rectangle die and shade with ink
4.  Glue the cloud DP down add the grass strip and then glue down the brown rectangle.  Next pop up the stable door with the horses.  Add the green grass piece to the bottom of the stable door
5.  For the sides of the fold cut 2 pieces of cloud DP 1 1/4 x 5 3/8 and 2 pieces 1 x 5 3/8
6.  Use some small pieces of green cut with the Slimline Grass die.  2 cut at 1 1/4 x 1 and 2 cut at 1 x 1 mine are just slightly different as you can see because the grass die has a slope in it

7.  Add the red flowers with little pearl centers and the butterflies.  Stamp and layer the sentiment and your card is complete.  Just for your info you sign your card on the back!

CottageCutz Products


Thanks so much for stopping by today.  I hope you take some time to get crafty.  And please don't forget to check out the new Country Farm release!

Blessings and Take Care
Pam

Friday, June 11, 2021

 Hi Everyone

Just a quick post today!

I live in Arizona and we have this fantastic and charming little scrapbook store that is privately owned.  It is one of a few stores of it's kind left.  I fell so fortunate to live close by!!  It is called Paper Collage.  I bought all of the fun papers and dies from her store.  By the way she designs all of her own paper! Here is her store check it out!


Thanks so much for stopping by today!

Blessings
Pam

Monday, June 7, 2021

Udderly Adorable!

 Hello Scrapping Cottage Friends 

IT IS NEW RELEASE TIME! The collection is called COUNTRY FARM! It has the most delightful dies.  Everything from Tractors to Cowboy Chicks!  Each die is just full of awesome details and can be used for so many different occasions.  Today, I am using the Country Farm Cows. 


Design Steps:

1.  Cut out all of the pieces using the Country Farm Cows die.  I used dark brown, white, tan, green gray, black and gold.  Shade the pieces and assemble them using a fine tip glue
2.  For the base card I used a kraft A2 card.  The DP is milk bottles cut at 4 x 4 with a red layer an 1/8 inch larger.  The red gingham is cut at 2 x 5 1/8 with a red layer an 1/8 inch bigger.  A rectangle cut on kraft card stock with the third from the largest Double Stitched Rectangle die
3.  Glue the DP to it's coordinating red layer.  Glue the gingham layer to the center of the card as shown.  Then on top of the gingham layer glue the milk bottles layer slightly to the left of center as shown.  Glue the double stitched rectangle slightly to the right as shown below
4.  Working on the kraft retangle glue down the fence and little clumps of grass first.  Add the milk bottles to the top of the fence.  Pop up the cow and the bucket.  Cut out a few flowers and leaves then glue them on top of the bucket as shown.  Add the sentiment and bow and your card is complete


5.  I decided to decorate the inside with left over scraps of the DP and an addition piece of fence

CottageCutz Products


I am so glad you were able to stop by today!  And I hope you can check out the new release in our online store.  Just click HERE!
Take Care and Blessings
Pam