Showing posts with label Pierced Square die. Show all posts

Sunday, February 6, 2022

Easter

 Hello Friends

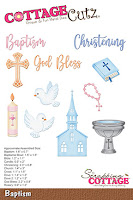
I am filling in for Wendy today.  I am starting to make a few of my Easter cards to get a little ahead.  The New Release die I am using is Baptism.  It has several really nice pieces that can be used in a number of different cards such as Easter, Weddings, Baptism and Sympathy.


Design Steps:

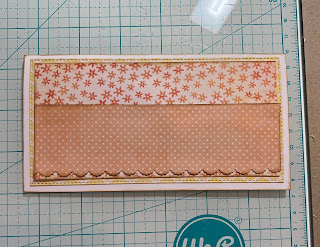
1.  I am using a mini white slimline for a base 6 1/4 x 6 1/2 folded in half.  Using the second from the largest Stitched Rectangle Slimline die I was able to make the cuts work using yellow DP.  Cut orange flowered DP 5 1/2 x 2 3/4.  Last cut a piece of orange dotted DP 5 1/2 x 1 3/4 and use a border punch on the bottom of it
2.  Ink all of the edges of the white card base and the DP before you glue together.  Glue down the yellow to card base next the flowered DP and last the dotted DP as shown above
3.  Using the Baptism die cut out the pieces in brown wood DP, white, yellow DP, and black (black Bible and little orange flowers not pictured). Cut the squares from yellow DP with the 4th from the smallest Pierced Square die
4.  Glue the squares at a diagonal as shown above.  Pop up the church in the middle, glue down the Bibles and the Cross flat.  Add the little orange flowers cut with Sending Hugs Bear add little pearls to the inside of the flowers and glue down your sentiment

CottageCutz Dies


Don't forget to check out the new Spring Release.  It is perfect for a number of different projects!
We have more inspiration on our YouTube Channel check it out HERE
Thanks so much for stopping by!  And I will see you Thursday.

Blessings and Take Care
Pam


Wednesday, August 11, 2021

Birthday Wishes

 Hello Scrapping Cottage Friends

It is time to make the CottageCutz family a little bigger.  We are adding a brand new line of Photopolymer Clear Stamps call Lil' Bluebird Designs.  We are kicking off this new line with 16 new stamp sets that have coordinating dies.  Make sure to check all of them out by clicking HERE

 Today, I am featuring the Happy Birthday set.  


Design steps:

1.  Using the Happy Birthday set stamp the images in Memento Black.  Use your Copic makers (colors pictured below) to color your images and then cut them out with the coordinating dies


2.  Using the second from the smallest Pierced Square die cut out 4 white squares.  Blend the squares with a blue ink
3.  Create little scenes with the critters.  I used Spring Grass cut on green card stock and Hills Slimline for the brown card stock hills.  When the scenes on each square are complete I cut 4 white Scalloped Squares using the second from the smallest die.  Then I layered the pieced squares on top of the scalloped square

4.  Pop up the little squares as shown above.  Stamp your sentiment which is also included in the Happy Birthday stamp set.  And your card is complete

Lil' Bluebird and CottageCutz Products


Thanks so much for stopping by today!  Please check out all the adorable new stamp set we have in the online store!
Blessings and Take Care
Pam

Thursday, September 24, 2020

Trick or Treat Ghost

Hello Scrapping Cottage Friends

We have some very cute Halloween dies that are not to scary for anyone you might want to send them too!  I have a very young great niece and nephew that are the perfect age to send a sweet Halloween card too.  I love seeing the wee little ones all dressed up for Halloween. I am using this adorable ghost with his Halloween balloon and pumpkin treat bucket.

Background Photo by Annie Spratt on Unsplash

Design Steps


1.  I am using a black card stock base with a gate fold.  You start with an 8 1/2 x 5 1/2 piece of black card stock then you score it at 2 1/8 and 6 3/8 inches and then fold
2.  Cut 4 pieces of Halloween DP 2 x 5 1/4 and purple DP 4 x 5 1/4.  Use your Pieced Square die second from the largest and cut a piece of purple DP layer it onto black card stock
3.  Glue the 4 pieces of Halloween DP to the front of the card and on the inside of the flaps
4.   Glue the purple DP to the center of the inside of the card.  Glue the purple pierced square to the layer of black
5.  Using the Trick or Treat Ghost die cut out the pieces using orange, black, yellow, white and purple card stock
6.  Using a fine tip glue assemble the little ghost.  Use a fine tip black marker to add the ghost's eyes and the bats eyes
7.  Pop dot the ghost to the purple square
8.  Stamp your sentiment and layer it onto purple then black card stock.  Glue the Ghost square as shown making sure you only put glue on the left side of the panel.  Next to the same for the sentiment
9.  For the inside I cut an additional little pumpkin and I also cut a rectangle using the 3rd from the largest Pieced Rectangle die.  Stamp the sentiment and glue it to the inside along with the little pumpkin.  Your card is complete

CottageCutz Products

Thanks so much for stopping by and please make sure to stop by the online store to check out these adorable Halloween dies!

Blessings
Pam


Sunday, July 26, 2020

Jaws!

Hello My Scrapping Cottage Friends

When I lived in South Carolina near the beach there were multiple shark sightings!  Needless to say when that happened the beaches cleared out very quickly!  The card I am sharing today reminds me of those days on the beaches in Hilton Head.  As a matter of fact this is going to one of my friends on the East Coast.

And don't forget to check out this release of dies in the online store.  This selection of dies features Pirates and Sea Creatures! There are 14 awesome designs in the collection and you are going to want each and everyone of them.   And there is more!! There is another brand new set of dies out called Beach and Tropical Release.  Be watching for our team to create some card designs with this awesome collection.

Background Photo by 

 1.  Cut a piece of white card stock 4 1/8 x 4 1/8 then using the largest Pierced Square die cut a square out of the middle of the 4 1/8 x 4 1/8 piece.  This will create a white frame.  Use a white A2 piece of card stock as the card base.  Cut out a 4 x 4 piece of ocean DP and a 1 x 4 piece of brown card stock cut with a slight hill for the ocean floor
2.  Using the Shark die cut out grey and white card stock.  Use the Mermaid die to cut out the seaweed in two shades of green.  Last use the Paddle and Rope Ladder die to cut out the rope and starfish
3.  Glue the Ocean DP flat to the center of the card front and add the ocean floor.  Place dimension tape to the back of the white frame and attach it around the ocean
4.  Shade all of the die cut pieces and using a fine tip glue applicator assemble the pieces
5.  Glue down the seaweed and add the rope.  Next finish by added additional seaweed, starfish and the shark
6.  I also used some additional tiny fish from the Paddle and Rope Ladder cut.  I cut them in navy and added them above the shark.  Stamp your sentiment and layer onto green and your card is complete

CottageCutz Products


Don't forget to check out the BRAND NEW RELEASE just perfect for those long hot summer days!

Blessings
Pam

Monday, June 8, 2020

Planting a Garden

Hello Scrapping Cottage Friends

I am using several different dies today to create this little garden card.  Plus some fun designer paper and ribbon.  Hope you can play along with me today!


Design Steps:

 1.  Using the Planter Box & Seeds die plus the Garden Tools die cut all pieces out of white card stock
 2.  Color the pieces using Tim Holtz inks and a sponge applicator.  Assemble the pieces using a fine tip glue
 3. Use a white A2 card base, Yellow card stock cut to 4 x 5 1/4 and Green checked DP cute 3 3/4 x 5.   Cut 2 yellow squares and 1 rectangle square using the Pierced Square and Pierced Rectangle dies.  Layer the squares and rectangle onto white card stock
 4.  Glue the checked DP to the yellow card stock layer.  Glue the yellow retangle and squares to their white layer then arrange onto the DP
 5.  Add the ribbon to the checked DP as shown.  Put pop dots onto the back of the squares and retangle then adhere to the check DP

6.  Add the die cut planter box, seeds, and tools to the squares and rectangle as shown.  Glue to the white card base.  To finish add the sentiment and rhinestones

CottageCutz Products

Thanks so much for stopping by!  I hope you are enjoying this release as much as I am there are a ton of different uses for these dies!

Blessings and see you next Thursday!
Pam