Monday, September 28, 2020

Halloween Fun!

 Hello Scrapping Cottage Friends

We have three new release that are being featured in the online store.  It is Christmas Part 1 with 22 new designs, Christmas Part 2 with 21 new designs,  and Halloween with 14 new designs.  They are all currently on sale with savings from 25% to 60%.  Shop early for those crafty friends.  They will love these dies and while you are at it get some presents for you too!

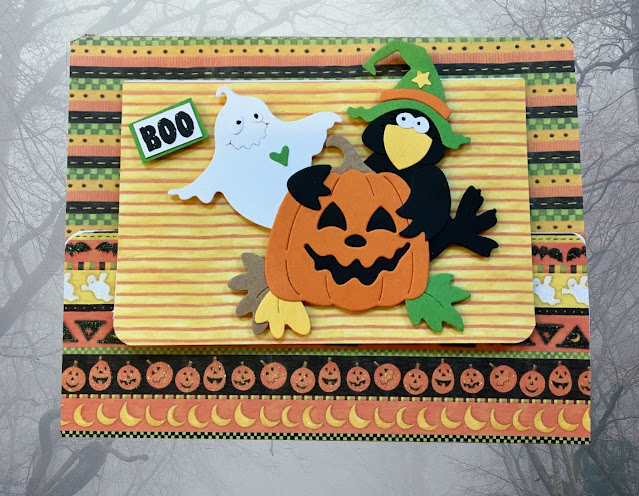
I am using an adorable die today for a fun Halloween card.  It is the Spooky Ghost and Crow.  


Design Steps:

1.  Use an A2 white card base and cut the front flap in half.  Round the corners of the card.  Next cut a piece of white card stock 5 1/2 x 4 1/4 fold in have and round the corners
2.  Cut a piece of DP 5 1/2 x 4 1/4 round the corners and glue to the inside of the card

3.  Cut 2 pieces of DP 5 1/2 x 2 round the corners and glue to the front flap and the inside flap

3.  For the smaller card on the front cut a piece of DP 2 3/4 x 4 1/4 and glue to the front flap of the smaller card.  Set aside
4.  Cut the pieces out using the Spooky Ghost and the Crow. I used white, orange, green, yellow, brown and black
5.  Glue the pieces together using a fine tip glue
6.  Pop the Ghost and Crow to the front of the smaller card.  Stamp Boo and layer onto green card stock

7.  Stamp the inside of the smaller card with Happy Halloween and add a little strip of the DP for decoration.  Attach the smaller card to the inside of the larger card making sure you have the bottom flap of the larger card open
8.  Close the card by bringing up the bottom flap of the big card inside the of the smaller card

9.  To keep the card closed I added a small Velcro dot to the inside of the front flap of the smaller card and the bottom front flap of the larger card

Scrapping Cottage Products


I am so glad you stopped by today!  I really appreciate it!

Blessings

Pam


Thursday, September 24, 2020

Trick or Treat Ghost

Hello Scrapping Cottage Friends

We have some very cute Halloween dies that are not to scary for anyone you might want to send them too!  I have a very young great niece and nephew that are the perfect age to send a sweet Halloween card too.  I love seeing the wee little ones all dressed up for Halloween. I am using this adorable ghost with his Halloween balloon and pumpkin treat bucket.

Background Photo by Annie Spratt on Unsplash

Design Steps


1.  I am using a black card stock base with a gate fold.  You start with an 8 1/2 x 5 1/2 piece of black card stock then you score it at 2 1/8 and 6 3/8 inches and then fold
2.  Cut 4 pieces of Halloween DP 2 x 5 1/4 and purple DP 4 x 5 1/4.  Use your Pieced Square die second from the largest and cut a piece of purple DP layer it onto black card stock
3.  Glue the 4 pieces of Halloween DP to the front of the card and on the inside of the flaps
4.   Glue the purple DP to the center of the inside of the card.  Glue the purple pierced square to the layer of black
5.  Using the Trick or Treat Ghost die cut out the pieces using orange, black, yellow, white and purple card stock
6.  Using a fine tip glue assemble the little ghost.  Use a fine tip black marker to add the ghost's eyes and the bats eyes
7.  Pop dot the ghost to the purple square
8.  Stamp your sentiment and layer it onto purple then black card stock.  Glue the Ghost square as shown making sure you only put glue on the left side of the panel.  Next to the same for the sentiment
9.  For the inside I cut an additional little pumpkin and I also cut a rectangle using the 3rd from the largest Pieced Rectangle die.  Stamp the sentiment and glue it to the inside along with the little pumpkin.  Your card is complete

CottageCutz Products

Thanks so much for stopping by and please make sure to stop by the online store to check out these adorable Halloween dies!

Blessings
Pam


Sunday, September 20, 2020

O Holy Night

 Hi Scrapping Cottage Friend

I am using a gorgeous die today and it reminds me of the songs O Holy Night and Silent Night.  I have already made at least a dozen Christmas cards so I feel pretty good.  I usually make about 30 cards for special friends and family.  

Background Photo by Jerry Larry on Unsplash

  • This card went together really quickly.  I used a black A2 card base and then cut some music DP 4 x 5 1/4. Glue the music DP to the black card base.  
  • Cut a strip of black card stock 5 1/4 x 1 and glue it to the bottom of the card.  
  • Cut a piece of tan DP for the hills 5 1/4 x 3 and glue it to the music DP just above the black strip.   
  • Cut black card stock using the die Nativity Christmas Scene.  I decided to add just a touch of sparkle so I put some gold DP behind the star and and then glued the manger scene to the card.  
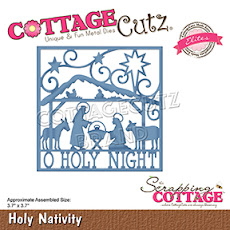
  • For the sentiment I used the Holy Nativity die cut out of black card stock.  As you can see I cut the O Holy Night from the bottom of the die then added gold DP to the back of the sentiment and glued it to the card
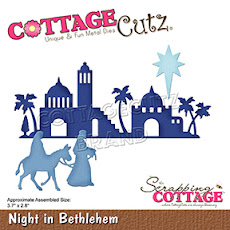
  • For the inside of the card I used another die Night in Bethlehem.  I cut it using black card stock and then glued it to the bottom of the inside of the card.  Stamp your sentiment and the card is complete

CottageCutz Products


Thanks so much for stopping by today and please take the time to stop by the online store.   As you can see we have some wonderful dies for this most holy time of year.
Blessings
Pam


Monday, September 14, 2020

Christmas Blessings

 Hello Scrapping Cottage Friends

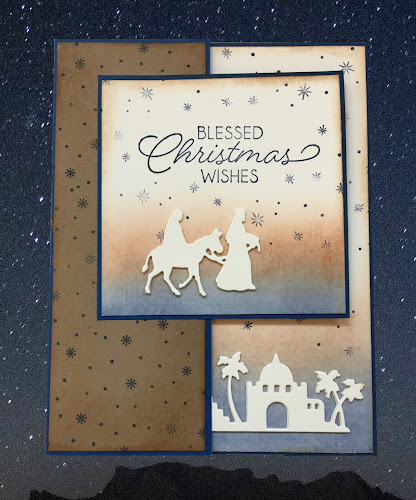
The design team is taking turns using Part 1 and 2 of the new Christmas release.  So it is my turn to use a die from part 2 release.  The dies representing the birth of Jesus are just beautiful.  I am using Night in Bethlehem.  I found a card on Pinterest that I loved so I am CASing Dawn Griffith's card.  She made hers using stamps and I used dies.  Thanks Dawn for the wonderful inspiration.


Design Steps:

1.  Using the Night in Bethlehem die cut out the pieces 3 times each.  Glue the pieces together so you have  nice thickness and depth
2.  Use a navy blue A2 card base.  After folding it in half cut the front flap in half.  Place a piece of kraft card stock on top of the front flap that has been stamped with tiny navy stars and edged with TH Vintage ink

3.  Cut two pieces of cream colored card stock one 4 x 5 1/4 and the other 3 x 3.  Next using your navy and rust colored inks blend the inks at the bottom of the pieces.  Stamp the stars and sentiments in navy

4.  Glue the town of Bethlehem and star to the bottom portion of the inside of the card.  Make sure the star is high enough that it doesn't show under the front square

4.  Layer the 3 x 3 square with navy and then attach to the front flap of the card.  Add Mary and Joseph and your card is complete

CottageCutz Products


I love this card and I know all of my family will too.  I can't wait to make at least a dozen more of them because they are easy and represent my faith and feelings about Christmas.

Blessings

Pam


Tuesday, September 8, 2020

New Christmas Release!

 Hello Scrapping Cottage Friends

I am thrilled to share with you that we have a hugh new Christmas release and a spooky but adorable Halloween release!  Each die is so detailed and they really gets your creative juices flowing!  I am having so much fun getting started on my cards for the holidays!

Today,  I am showcasing the ever popular Gnomes that are all over the paper crafting industry right now!  But of course I think our Gnomes are just the cutiest!

Background Photo by Anastasiya Romanova on Unsplash

Design Steps:

1.  Cut all of the pieces using the Gnome w/Lights and the Moose in the Forest dies.  I used green, green DP,  red, yellow, blue, white, purple, brown, black and orange card stock
2.  Glue the light bulbs to the black light line and also glue the holly berries to the leaves.  Then add Glossy Accents to the bulbs and berries.  Set aside to dry
2.  Use TH's inks and shade all of the pieces and then glue together using a fine tip glue
3.  Use a white piece of card stock cut to 8 1/2 x 7 1/2.  On the long side fold in half then take the front flap and fold it in half.  This will create a little tent
4.  Cut a piece of DP 4 x 7 1/2 and glue to the front tent fold.  I also cut a piece of green DP for the inside of the card measuring 7 1/2 x 3 1/2  
5.  Open the card up and glue down the green DP.   Next cut a piece of white glitter card stock 7 1/2 x 2 and create the snowy hill.  Glue it to the bottom of the green DP.  For the greeting I used vellum with the sentiment printed on it.  The vellum is slightly longer then the card so  that I could tape it to the back of the card.  This way nothing would show through the vellum
6.  Using dimensional dots pop up the tree and the little Gnome
7.  Add a few sticker snowflakes and a larger plastic snowflake to the card and it is complete

CottageCutz Products


The new Christmas and Halloween releases are just amazing!  I hope you can stop by the online store and take a peek.  And right now they are on SALE!!
Blessings

Pam

Tuesday, September 1, 2020

Flamingo Greeting

 Hello Scrapping Cottage Friends

It is Pam creating with you today on the blog.

As summer is winding down here in Arizona the temps are in the 90's which feels really comfortable since most of our summer has been record breaking in the 100's.  I must say I am so blessed that we have air conditioning and a pool to jump into!! Anyway onto the card today  I am using the flamingo in a card to congratulate a friend who just bought a new place. 
Background Photo by Roberto Nickson on Unsplash


Design Steps:

1.  Use the Flamingo w/Hibiscus die and cut out using purple, green, black, gray, yellow, white, dark pink and light pink card stock.  Shade the pieces with TH inks and a small applicator then glue together with a fine tip glue
2.  Using the Hibiscus Flowers die cut out the flowers in dark purple, light purple, green and yellow card stock.  Glue together using a fine tip glue
3.  Cut a piece of white card stock 4 x 5 1/4 and then run it through a leaf embossing folder.  Arrange the Hibiscus and flamingo then glue down
4.  Use a white A2 card base and cut a piece of purple card stock just an 1/8 in smaller then the base.  Glue the purple to the base and then add the embossed panel.  Stamp your sentiment and layer onto purple card stock and glue to base.  For a final touch add a few sequins

CottageCutz Products


I am looking forward to a little cooler weather!  And my favorite season is fall.  I hope you had a wonderful summer filled with great memories!
Blessings
Pam