Sunday, July 31, 2022

Yum Donuts!

 Hello Friends

The new Strawberries and Bees release has so many fun dies including two of my favorite things coffee and donuts!!!  I am using both of these items which come on one die called Strawberry Treats 3.

Here is my card for today!


Design Steps:

1.  Cut out all of the pieces using the Strawberry Treats 3 die and the following card stock: red, pink, white, tan, green, dark and brown.  Shade with inks and a fine tip applicator then assemble

2.  Cut a rectangle that will fit all of the donuts in white and then glue the donuts to the white rectangle

3.  For the card base use a white 6 1/4 x 4 1/4, cut a piece of brown dotted DP 6 1/8 x 4 1/8 and also cut 3 Pierced Wide Rectangle Frames 2 in white and one in light brown (which I forgot to put in the picture!)
4.  Glue the brown dotted DP to the white card base.  Glue the donuts to the front of the card as shown.  I added some metal tags spelling yum
5.  Glue the 3 frames together placing the light brown one on top.  Then add dimension tape to the frame and pop it to the card.  Final step is to add the coffee cup with a little dimension tape on one side and glue on the other

CottageCutz Products


Here is the new release so please check it out in our store today!!

We have more inspiration on our YouTube Channel check it out HERE
Thanks so much for stopping by!  And I will see you next Thursday.

Blessings and Take Care


Monday, July 25, 2022

Bee Happy

 Hello Scrapping Cottage Friends, 

We have a huge Christmas in July sale going on right now! The sale ends July 29th. So don’t miss a chance to save up to 65% off!  Check it out HERE

We also have a new release and it is just plain adorable.  It is called Strawberries and Bees perfect for those fun summertime cards. There are 16 designs in this new collection and you can get the individual dies for 30% off right now! This sale will not last so shop today to get the incredible savings.

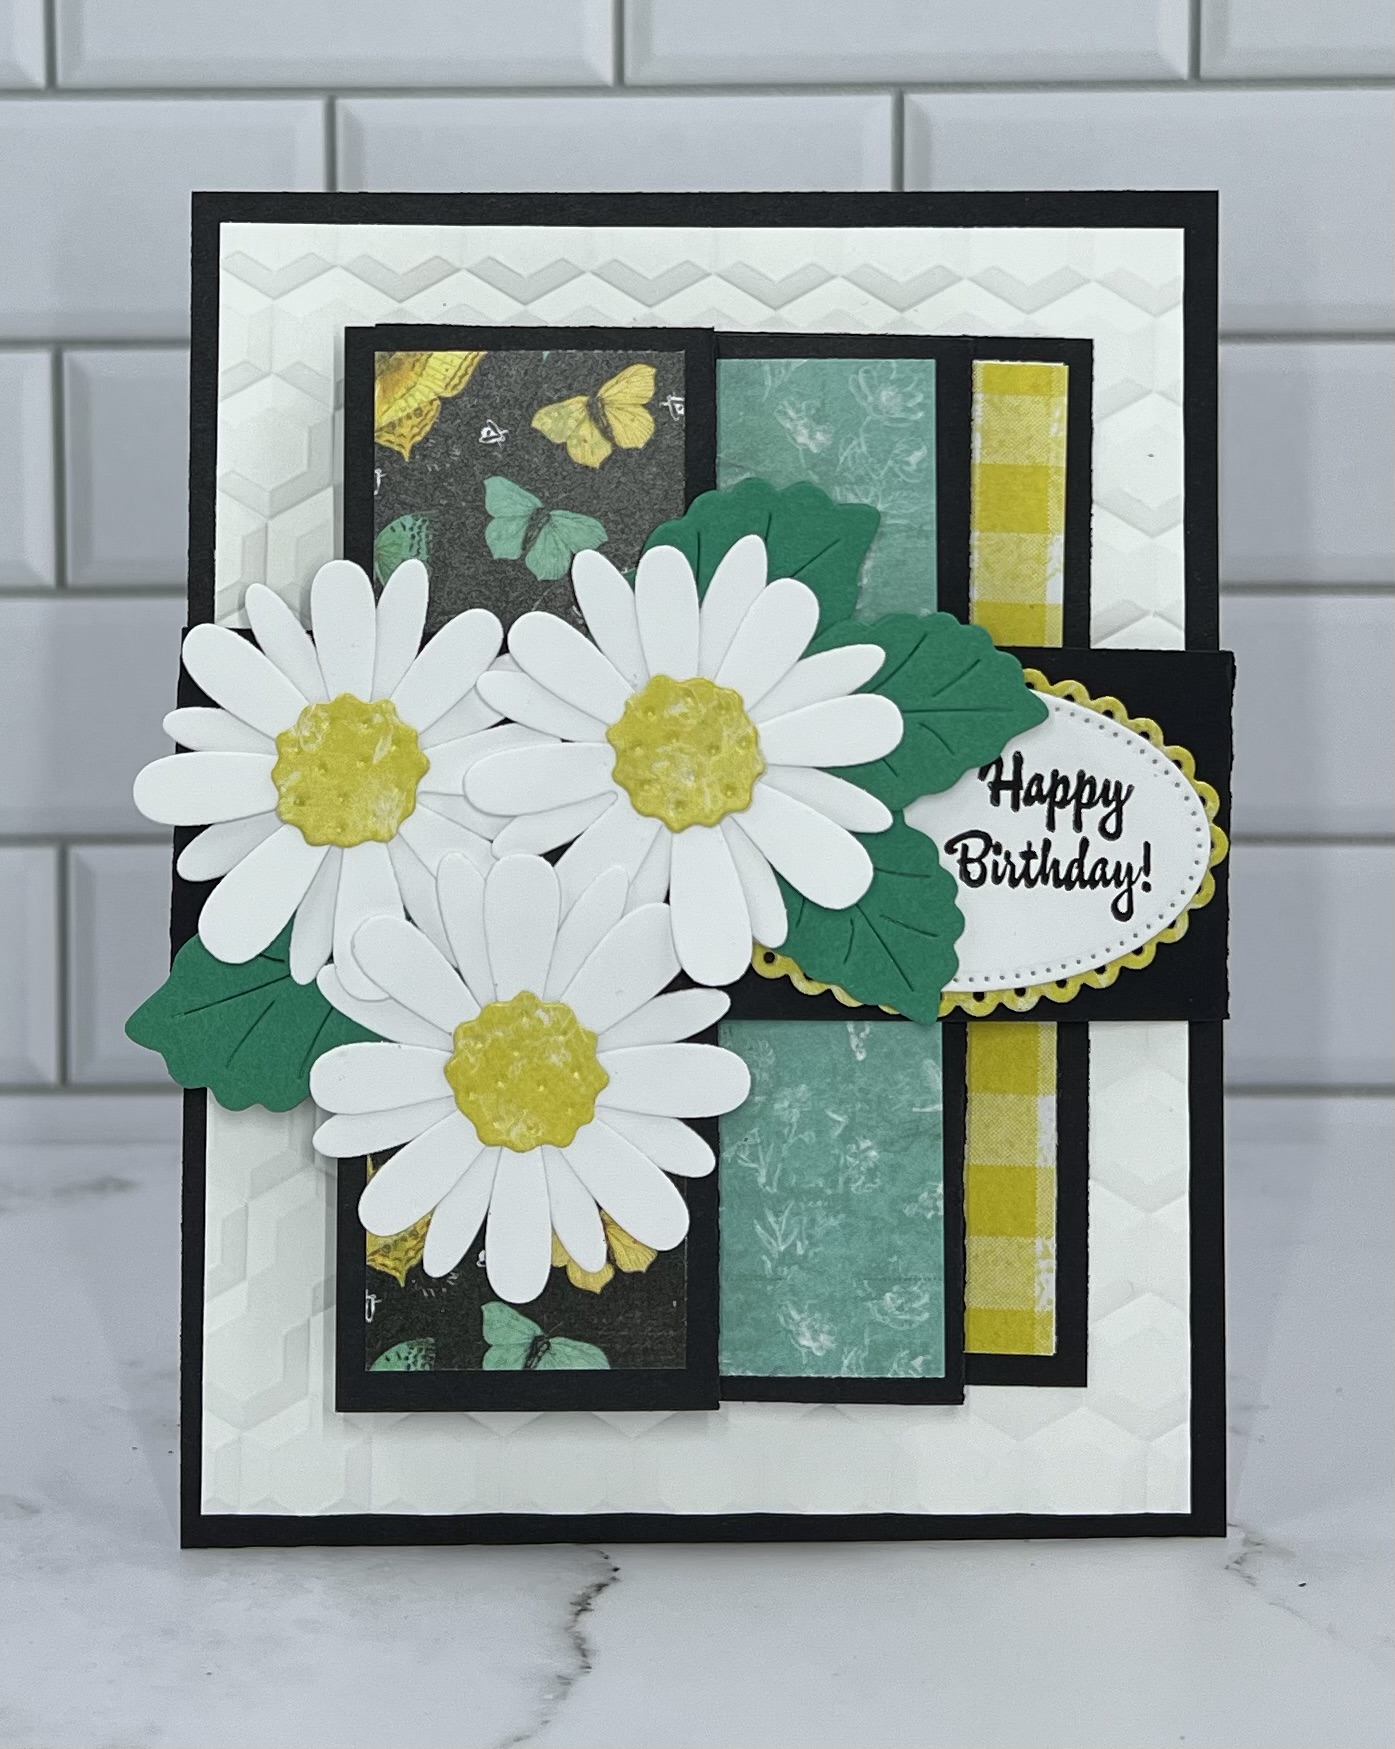
Here is my card for today using two new release dies Honey Bee and Bee Phrases.


Design Steps:

1.  Start with a black A2 card base with the front flap cut in half.  2 pieces of white card stock cut at 4 1/8 x 5 3/8 and 5 3/8 x 2. 2 pieces of DP cut at 4 x 5 1/4 and 1 3/4 x 5 1/4
2.  Glue the DP pieces to there matching white layer and then glue them to the black card base
3.  Use the Scalloped Circle die second from the largest and cut two pieces of yellow card stock.  Use the Cross Stitched Circle die third from the largest and cut two pieces of white card stock.  Glue the pieces together (One will go on the inside of the card)
4.  Use the Honey Bee die and cut out pieces using: yellow, mustard yellow, black, red, vellum and brown
5.  Shade the pieces with ink and a small applicator.  Assemble the pieces with fine tip glue and then arrange onto the white circle as shown above.  Use a white gel pen to dot the eyes
6.  Using the Bee Phrase die cut out the mustard yellow and red card stock.  Shade with ink and a small applicator
7.  Glue the scalloped circle to the edge of the front flap as shown above.  Glue down the sentiment
8.  I decided the card need just one more little bee so I cut out the second bee and glued it to the bottom right of the card as shown


9.  For the inside stamp the white circle with your sentiment and then glue directly under the front circle and your card is complete


CottageCutz Products


Here is the new release so please check it out in our store today!!

We have more inspiration on our YouTube Channel check it out HERE
Thanks so much for stopping by!  And I will see you next Thursday.

Blessings and Take Care


Saturday, July 23, 2022

I've Been Published

 Hello Friends

Just wanted to share in my excitement!  I have been published in the summer edition of the Creative Scrapbooker Magazine!


Here are the two cards in the magazine!


Thanks for sharing in my fun surprise!

Blessings


Saturday, July 16, 2022

Berry Sweet

 Hello Scrapping Cottage Friends, 

We have a new release and it is just plain adorable.  It is called Strawberries and Bees perfect for those fun summertime cards. There are 16 designs in this new collection and you can get the individual dies for 30% off right now! This sale will not last so shop today to get the incredible savings.

Here is my card for today using three new release dies Strawberry Treats 1, Strawberry Treats 2, and  Berry Phrases.


Design Steps:
1.  Use a white slimline for the card base measuring 3 1/2 x 8 1/2, cut a piece of white card stock 3 1/2 x 8 1/2 with the Circle Window Slimline die and your final piece is a checked blue DP at 3 1/4 x 8 1/4
2.  Glue the blue checked DP to the white card base and then glue down the Circle Window piece.  Using the Berry Phrase die cut out the Berry in red and the Sweet in black.  Glue to the center circle
3.  Using the Strawberry Treats 1 die cut out the pieces in pink, brown, red, white and green.  Assemble with a fine tip glue
4.  Using the Strawberry Treats 2 die cut out the pieces in pink, brown, red and green.  Assemble with a fine tip glue
5.  Glue the cake in the left circle and the icecream in the right circle 

6.  Using the same dies cut out a few extra strawberries and add then to the card as shown.  To complete the card add some silver sequins

CottageCutz Products

Here is the new release so please check it out in our store today!!

We have more inspiration on our YouTube Channel check it out HERE
Thanks so much for stopping by!  And I will see you next Thursday.

Blessings and Take Care


Saturday, July 9, 2022

Daisy Birthday Wishes

Hello Scrapping Cottage Friends, 

We have a new release and it is just plain adorable.  It is called Strawberries and Bees perfect for those fun summertime cards. There are 16 designs in this new collection and you can get the individual dies for 30% off right now! This sale will not last so shop today to get the incredible savings.

Here is my card for today using the new release die Flowers and a fancy fold.  The idea for the fancy fold design is from Sharon Hashimoto Burkert.  I just loved her card so I had to give it a try.


Design Steps:

1.  For the fancy fold part of the card use a piece of black card stock 4 1/4" x 11" scored at 3", 5 1/2", 8", 9 1/2"
2.  The base of the card is a piece of black card stock 4 1/4" x 5 1/2" and white card stock embossed with a honey comb 4" x 5 1/4".  The decorative pieces for the fancy fold are as follows: two pieces cut at 1 1/4" x 4" (black checked and butterfly paper) one at 2 1/4" x 4" (teal flower paper) one at 1/2" x 4" (yellow checked) and white cut at 2 1/4" x 4" and 2 3/4" x 4".  The belly band is black 1 1/2" x 9 1/2"
3.  Glue the white honey comb card stock to the black base, glue the butterfly paper to the first flap, next is the black checked DP, 3rd panel is the teal flower DP, next two panels are the white and finally next to the white on the last panel add the strip of yellow checked DP

4.  Fold your fancy fold piece and glue it to the card base and then place the belly band around the card and glue the band together

5.  Using the Flowers die cut out 3 of the Daisies in white, 3 centers in yellow, and 4 leaves in green.  Assemble the flowers using a fine tip glue.  Using the 2nd from the smallest Scalloped Oval cut it out in yellow.  Using the 2nd from the smallest Pierced Oval cut it out in white.  Stamp the right side of the white oval with Happy Birthday and then glue to the yellow oval

6.  Place your belly band around the card and glue down the sentiment oval to the right on the band.  Glue one of the flowers just below the belly band and the other two flowers on the belly band as shown in the pictures above and below.  Stamp the inside of your card and it is complete

CottageCutz Products


Here is the new release so please check it out in our store today!!

We have more inspiration on our YouTube Channel check it out HERE
Thanks so much for stopping by!  And I will see you next Thursday.

Blessings and Take Care