Sunday, April 24, 2022

Emu..sing Birthday

  Hello CottageCutz Friends

I have created a funny little birthday card today.  I made it using the new release die called the Emu.  There are 14 different dies in this release and all of them are just as cute as they can be!!  If you haven't checked out the Australian Friends Release click HERE. 


Design Steps:

1.   Using the Emu die cut out the pieces in dark brown, light brown and black.  Shade the pieces in black ink and dot his eyes with a black marker.  Assemble with a fine tip glue
2.  For the Mini Slimline card base use a piece of white card stock 6 1/2 x 6 1/4 folded on the 6 1/2 inch side.  Cut a piece of white card stock 6 1/8 x 3 1/8 and blend blue ink onto it using a brush
3.  Using the slimline Grass and Farm Fence die cut out the grass in green and the fence in white.  Also for the background use the Outback Trees die and cut out two palms using brown and dark green
4.  Glue the pieces to the inked blue card stock as shown above
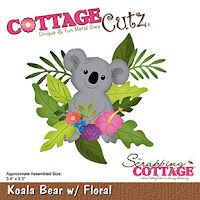
5.  To give the card a little pop of color I used the Koala Bear w/Floral die and cut out 5 yellow flowers and 4 green stems of leaves
6.  Glue the flowers and stems of leaves as shown above and then add some tiny pearls to the center of the flowers
7.  Pop up the Emu and add your sentiment.  Your card is complete

CottageCutz Products


We have more inspiration on our YouTube Channel check it out HERE
Thanks so much for stopping by!  And I will see you next Thursday.

Blessings and Take Care


Sunday, April 17, 2022

Sassy Croc!

  Hello CottageCutz Friends

I have a sassy little birthday card today.  I made it using the new release die called the Crocodile.  There are 14 different dies in this release and all of them are just as cute as they can be!!  If you haven't checked out the Australian Friends Release click HERE.


Design Steps:

1.  Using the Crocodile die and the following colors of card stock: green, pink, white, black, yellow and dark green cut out the pieces.  After the pieces are cut shade with different colors of inks and a small applicator.  After shaded glue the crocodile together usings a fine tip, fast drying glue
2.  Cut a piece of white card stock 4 1/4 x 2 1/2.  Next use the Hills Slimline die and cut the top of the card stock to create the hill.  Use a piece of black card stock and cut out Oh Snap which is included in the Film Strip Slimline die.  Glue the Oh Snap as shown above and then stamp the sentiment just under it in black ink
3.  The base of the card is an A2 white.  Using the Cloud Horizontal Slimline die cut out a variety of different size cloud.  Glue the hill with the sentiment to the bottom of the card and pop up the clouds as shown making sure to leave room for the crocodile
4.  Place pop squares on the back of the Crocodile and then pop him to the front of the card as shown below.  Your card is complete

CottageCutz Products


We have more inspiration on our YouTube Channel check it out HERE
Thanks so much for stopping by!  And I will see you next Thursday.

Blessings and Take Care


Saturday, April 9, 2022

G'day Mate!

 Hello CottageCutz Friends

We have a new release and it is on sale!!

for a limited time...
Australian Friends Release

Save 30% on Individual Designs
14 New CottageCutz Designs

Today, I am using 3 of the new release dies: Kangaroo, Koala Bear w/Floral, and the Cockatoo.
Design Steps:
1.  Using the following dies cut out the little critters Kangaroos, Koala Bear w/Floral, and the Cockatoo.  Using the following colors of card stock: Three shades of green, brown, tan, gray, black, white, light and dark pink.  Shade the pieces with a variety of ink colors and a small applicator
2.  Use a slimline white base 8 1/2 x 3 1/2.  Cut a piece white card stock 8 1/2 x 3 1/2 with the Circle Window Slimline die.  Cut a piece of DP blue 8 1/4 x 3 1/4
3.  Tape the edges of the blue DP to the back of the white slimline circle piece.  I just taped the edges so I can slip in the little critters and leaves
4.  Arrange your leaves and critters inside each circle and then glue them down
5.  Stamp your sentiment and layer it onto a piece of green card stock.  Then glue your slimline panel to the white card base and your card is complete

CottageCutz Products


We have more inspiration on our YouTube Channel check it out HERE
Thanks so much for stopping by!  And I will see you next Thursday.

Blessings and Take Care


Tuesday, April 5, 2022

Black Swan

 Hello CottageCutz Friends

We have a new release and it is on sale!!

for a limited time...
Australian Friends Release
Save 50% on Bundle
Save 30% on Individual Designs
14 New CottageCutz Designs

Today, I am using the new Swan die and I just love how this card turned out!
Design Steps:
1.  Use the Swan die and cut out the pieces: black, blue, white, green, brown, and grey.  Shade the swan and the other pieces with inks and Copic Markers.  Use the Pierced Wide Circle Frame die (the largest) and cut it out of white and black card stock.  Use the center of the white circle and blend in grass and sky using inks
3.  Glue the pieces of the swan, rocks, pond and grasses to the inked circle as shown above
3.  Back the inked white circle with the black circle and glue the black frame on top of the white frame.  I did this for a little more stability 
4.  I used a black A2 card base and some DP cut 4 1/8 x 5 3/8.  Glue the patterned DP to the black card base
5.  Glue the circle to the middle of the DP.  Stamp your sentiment and layer onto black card stock.  Glue the sentiment to the card as shown below and your card is complete

CottageCutz Products


We have more inspiration on our YouTube Channel check it out HERE
Thanks so much for stopping by!  And I will see you next Thursday.

Blessings and Take Care