Wednesday, August 2, 2023

Let's Chill

 Hello Friends

Today's post is for the House-Mouse Monday Challenge!  The challenge is Anything Goes or Sparkle.  You can find this challenge HERE!  I decided to go with sparkle.  I made sparkling lemonade and a few epoxy dots with sparkle!


This is such a perfect challenge for using those wonderful House-Mouse Stamps!   Come and join the fun!


Thanks for taking a peek!

Blessings
Pam

Saturday, July 29, 2023

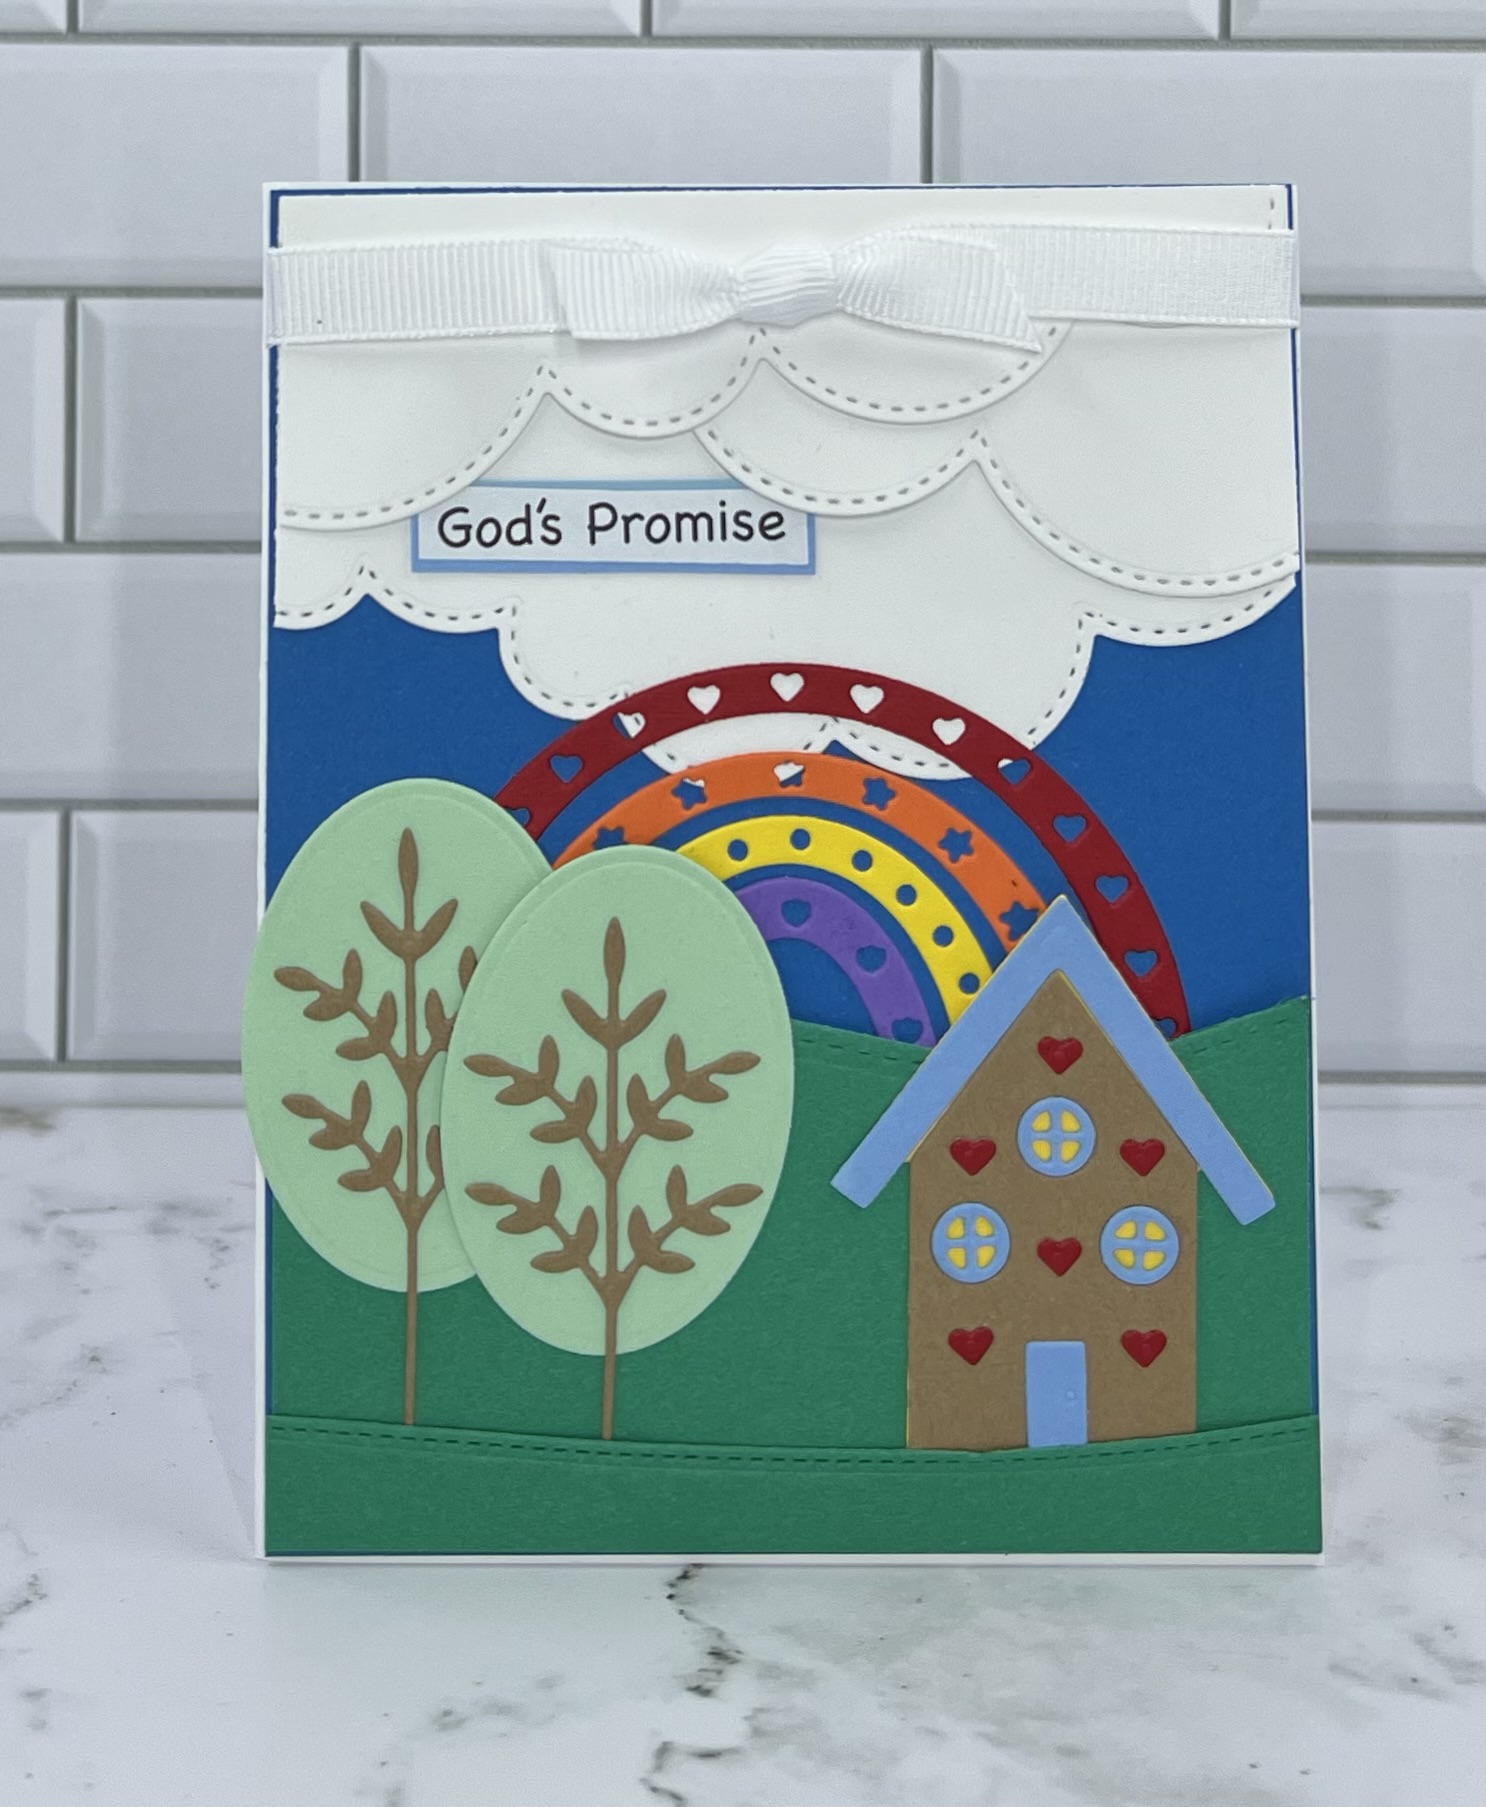
God's Promise

Hello Friends

This is going to a friend to brighten her day.  I chose a lot of vivid colors to bring some cheer!

I am using the Folk Art Rainbow, Folk Art Trees and Folk Art Houses.   This die is from our Folk Art release!  There are 19 wonderfully detailed dies in this collection.  Each die can be used together or separately. These are fantastic versatile dies.


Design Steps:

1.  Start by using the Folk Art Rainbow, Folk Art Trees and Folk Art Houses dies.   Cut the following colors of card stock:  red, yellow,  mint, light blue, dark blue, purple, orange, and brown
2.  Prepare the card base: A2 white base, 4 1/8 x 5 3/8 blue, 2 1/4 x 5 3/8 green cut with the Hills Slimline die, white cut with the Clouds Slimline
3.  On the blue layer arrange the clouds and hill (do not put glue on the very top edge so you can tuck in the rainbow) as shown above
4.  Tuck the rainbow down into the grass as shown and glue
5.  Add the trees to the left of the rainbow and the small layer of grass at the bottom as shown above
6.  Add the ribbon and sentiment to the clouds.  Then tuck in the small house to the right of the trees.  Your card is complete 


We have more inspiration on our YouTube Channel check it out HERE

Thanks so much for stopping by!  And I will see you next Thursday.

Blessings and Take Care


Sunday, July 23, 2023

Birthday Flowers

 Hello Friends

I am catching up with my Birthday cards.  I don't have any birthdays in August so I thought it would be a good time to restock because I have 8 in September.

I am using the Folk Art Tulip  This die is from our Folk Art release!  There are 19 wonderfully detailed dies in this collection.  Each die can be used together or separately.  They are perfect for people's birthdays of all ages!

Design Steps:

1.  Begin by using the Folk Art Tulip to cut out the flowers on the following colors of card stock: red, yellow, black, green and orange.  Assemble with a fine tip glue
2.  Next using Sentiment w/ Shadows Happy Birthday cut on black and white card stock.  Glue together

3.  For the card base use a white slimline 8 1/2 x 3 1/2.  Use the Lattice Slimline die and cut it out of white.  Glue the lattice to the front of the white slimline base card
4.  Glue the flowers as shown above and add the sentiment as shown.  I also added a few silver sequin
5.  To add a little to the inside of the card I glued a flower to the right and then stamped the sentiment.  My card is complete


We have more inspiration on our YouTube Channel check it out HERE

Thanks so much for stopping by!  And I will see you next Thursday.

Blessings and Take Care


Sunday, July 16, 2023

Christmas Deer

 Hello Friends

I am celebrating Christmas in July by making my very first card for the holidays!  I always start early and end late!!

I am using the Folk Art Deer.  This die is from our Folk Art release!  There are 19 wonderfully detailed dies in this collection.  Each die can be used together or separately.  They are perfect for multiple occasions even Christmas!


Design Steps:

1.  Use an A2 kraft card base, 4 1/8 x 5 3/8 red dotted DP, 4 x 5 1/4 tan DP and 1 1/2 x 5 3/8 strip of DP.  Ink the edges of all the pieces with TH Vintage Photo
2.  To add a little texture tape a stencil to the tan DP and use some Glitter Snow paste in small quantities all over the card front.  Let it dry to continue

3.  Using the Folk Art Deer cut it out of kraft card stock and shade with ink.  Using the Star Window Slimline Die cut out two red dotted DP stars and 2 gold stars.  Using the Victorian Border die cut out two borders in gold

4.  Glue the red dotted DP to the card front and then add the tan DP. Next glue the borders to the top and bottom of the DP strip then glue to card front as shown.  Glue the stars together with the gold star on the bottom but slightly showing on the right side of the star
5.  To add another layer of texture I dyed a piece of cheese cloth with a walnut spray ink.  I let it dry and then layed it on top of my middle strip as shown above.  To anchor the cheese cloth I added extra glue to the stars and pushed down firmly to make sure the glue held
6.  Add the deer and your sentiment.  For the sentiment I embossed in gold and layered it on a piece of gold card stock

7.  I added just a little greenery by cutting green leaves and red berries using the Woodland Birdhouse.  Add the greenery to the card along with the red berries and your card is complete


We have more inspiration on our YouTube Channel check it out HERE

Thanks so much for stopping by!  And I will see you next Thursday.

Blessings and Take Care


Friday, July 14, 2023

Oh Happy Day!

   Hello Friends

Today's post is for the House-Mouse Monday Challenge!  The challenge is Anything Goes or Circles.  You can find this challenge HERE!  I decided to go with circles.  It is a Just Because card to brighten someones day.


This is such a perfect challenge for using those wonderful House-Mouse Stamps!   Come and join the fun!


Thanks for taking a peek!

Blessings
Pam

Sunday, July 9, 2023

Just Because

Hello Friends

Today, I am making a few Just Because cards.  I love sending cards to friends and family for no reason at all!  Many times people tell me when they received the surprise in the mail it was perfect timing.  Because their day wasn't going very well! So with that in mind I made this card with the folksy art look and bright colors to brighten someone's day!

I am using the Folk Art Bird and the Folk Art Flowers Mixed.  These dies are from our Folk Art release!  There are 19 wonderfully detailed dies in this collection.  Each die can be used together or separately.  They are perfect for multiple occasions.  


Design Steps:


1.  Using the Folk Art Bird and the Folk Art Flowers Mixed cut out the following colors of card stock: red, orange, green, yellow and brown


2.  Use a fine tip, clear drying glue to assemble the pieces


3.  Cut a 5 inch kraft circle card base and then run it through the embossing folder of your choice

4.  Begin to arrange your piece onto the circle.  You will notice that I changed up my design a little on the final card


5.  Once you have decided on your design glue the pieces in place add your sentiment.  I used vellum and embossed in gold for my sentiment. Your card is complete


We have more inspiration on our YouTube Channel check it out HERE

Thanks so much for stopping by!  And I will see you next Thursday.

Blessings and Take Care