Showing posts with label Woodland Christmas Set. Show all posts

Monday, November 11, 2024

Christmas Poinsettia

 Hello Friends

I have offically started my Christmas cards!  I am lucky I have a few left over from last year so I don't have to make quite as many!  But I am filling my time with some projects for our Church boutique.  The card I am making features the Woodland Christmas Set.


Design Steps:

1.  Use an A2 white card base.  Cut a piece of white card stock 4 1/8 x 5 3/8 and run it through a snowflake embossing folder.  Cut 3 large snowflakes out of glitter card stock using the Crystal Flurry Snowflake die.  Glue the embossed card stock to the front of the card and then add the snowflakes 
2.  Use a white piece of card stock and then blend red and pink ink over the piece
3.  Use a piece of white card stock and blend green inks over the piece
4. Use the Woodland Christmas Set and cut out 3 poinsettia and 6 leaves.  Using the Christmas Floral 2 cut out 5 pine branches
5.  Glue the poinsettia to the front of the card as shown
6.  Add the leaves and the pine branches.  For the Merry Christmas I used the Merry Christmas Ornament and cut out the Merry Christmas.  Add the centers to the poinsettia. I used micro beads called Prills and dyed them yellow.  Your card is complete


We have more inspiration on our YouTube Channel check it out HERE

Thanks so much for stopping by! 

Blessings and Take Care


Saturday, November 13, 2021

Christmas Poinsettia

 Hello Scrapping Cottage Friends

The design team is continuing to use our two new Christmas release dies.  The two releases are at 30% off but this great sale won't last long.  So make sure to take a peek before the prices go up.  I am using one of the very versatile dies the Woodland Christmas Set.  There are a number of great designs on this one die.  I am using the beautiful Poinsettia for this card.


Design Steps:


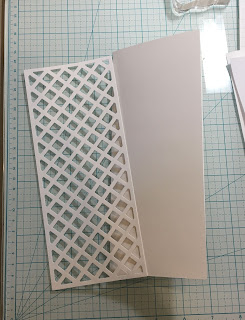
1.  Use a white slimline base measuring 3 1/2 x 8 1/2.  Cut a piece of white card stock using the Lattice Slimline die for the cards background.  Glue the Lattice to the front of the white slimline base card

2.  Next using the Woodland Christmas Set die cut out the red flowers, green leaves and the gold centers.  For the gold berries I used the Christmas Floral #2

3.  Use a stylus to give the flowers and leaves a little bend.  Rub the back of the petals and then flip over and make a circular motion in the cener of the flower.  For the leaves just rub the back of the leaves

4.  Make your arrangement just slightly below the center of the card.  I used glue dots for the flowers and tucked the leaves and gold berries in with glue
5.  Stamp your sentiment and layer with red card stock.  Glue the sentiment to the front of your card and your card is complete

CottageCutz Products


I want to remind everyone that the CottageCutz You Tube channel is up and running once again. We have new videos every Wednesday.  Check it out right HERE!

Take Care and Blessings

Pam


Sunday, October 31, 2021

Peace On Earth

 Hello Friends,

Guess What!! It is New Release Time!  The collection is Christmas Part 2!  There are are 19 new designs just as adorable as the Christmas Part 1 release.  For a limited time there is 30% off individual dies.  You can check all of these fantastic dies out right HERE!

I am showcasing two of the new release dies today.  The Peace on Earth with it's beautiful font and the Woodland Christmas Set specifically the gorgeous poinsettia.  I added a lot of gold for some extra Christmas bling!


Design Steps:

1.  Using the Woodland Christmas Set I cut the poinsettia out of striped DP, the leaves out of dark green and the centers out of gold.  Next I gave them some shape by using my stylus first on the back of the petals and then flipping them over and pressing down in the center of the flower.  For the leaves just run the stylus over the back of the leaves
2.  I used black ink on the edges of the flowers and leaves for a little depth.  Then used a glue dot or a strong glue to assemble the flowers

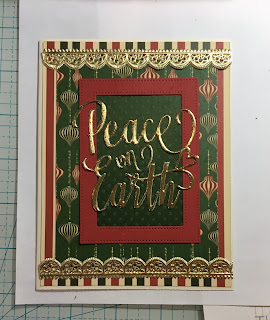
3.  Using the same gold card stock that you used for the center of the flowers cut out the Peace on Earth phrase

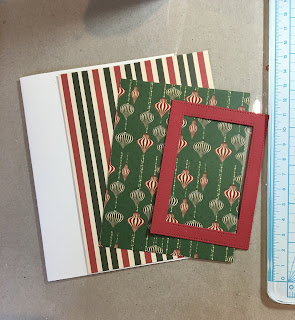
4.  For the card base use a cream colored card stock in an A2 size.  Cut a piece of Striped DP 4 x 5 1/4, a piece of ornament DP 3 1/2 x 4 1/2 and using the second to the largest Pierced Rectangle Frame die cut out a red frame.  Cut out a piece of dark green card stock 2 1/2 x 3 1/2 to place behind the frame
5.  Glue the striped paper to the card base, next glue the ornament DP to the center of the striped paper.  Glue the dark green card stock behind the red frame and then glue the frame to the card center.  Add the lacy foil trim to the top and bottom of the card as shown
6.  Next add the Peace on Earth phrase glued flat, the poinsettia and the leaves and your card is complete


CottageCutz Products

Thanks you so much for stopping by today and as always I look forward to seeing you next Thursday to share more crafty ideas!

Take Care and Blessings
Pam