Friday, December 20, 2024

Christmas Wreath

  Hello Friends

Today's post is for the House-Mouse Monday Challenge!  The challenge is Anything Goes or Christmas.  I decided to go with Christmas. The circle frame is a CottageCutz die.  The House Mouse stamp is called Wreath Ribbon Tying.  Check out the challenge HERE.

 Background Photo by Freepiks


This is such a perfect challenge for using those cute little House-Mouse and Happy Hopper Stamps!  Come and join the fun!

Thanks for taking a peek!
Blessings

Pam


Saturday, December 14, 2024

Silent Night

Hello Friends 

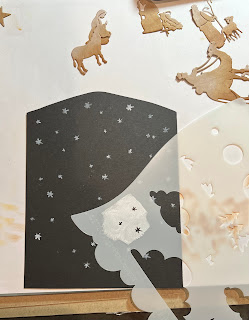
I am using some gorgeous dies today.  They represent the true meaning of Christmas.  The dies are Nativity Stable, Shepherd & Animals:  Nativity Camel, Palm Tree & Angel: Nativity Holy Family & Wise Men.  This is my last card of the season and it will be my template for my cards next year!

Wishing you all a very Merry Christmas and a blessed Happy New Year!!


  Background Photo by Freepiks

Design Steps:

1.  Using a white piece of card stock measuring 8 1/2 x 5 1/2 score at 2 1/8 and 6 3/8.  Bend the card directly in half and cut at an angle.  Open it up and round off the center point.  Use the card base as a template for the black pieces.  I cut 4 side panel pieces and one middle piece
2. Use the Nativity Stable, Shepherd & Animals:  Nativity Camel, Palm Tree & Angel: Nativity Holy Family & Wise Men and cut on Kraft card stock.  Next use white ink and blend the tops of all the pieces.  Use the Vintage Photo ink for the bottom of each piece

3.  Use a stencil and add all the tiny stars in the sky with white ink.  Do this on all of the panels


4.  Add a strip to the bottom measuring 1 1/4 inches and tear it at the top.  Ink with white ink on the top and Vintage Photo on the bottom.  Place the manger with Mary, Joesph and Jesus in the center panel

5.  Add the Shepard and palm tree to the left side panel.  Then add the 3 wise men to the right side panel
6.  Glue the panels to the inside of the card and then add the sentiment

7.  To decorate the front glue your star black panels down.  Add the sandy ground, sentiment and the camel.  Your card is complete 


Thanks so much for stopping by! 

Blessings and Take Care


Friday, December 6, 2024

Christmas Forest


 Hello Friends

I am finishing up my Christmas cards.  I have just a few more to make.  The one I made today is realitivily simple so I am going to make multiples.  I am featuring the following dies: Merry Christmas w/Deer Family, the Pine Tree Slim and the Pine Tree Full.

 Background Photo by Freepiks

Design Steps:

1.  White card base 5 x 5, DP 4 1/2 x 4 1/2, white card stock 4 1/4 x 4 1/4  with a circle cut out of the center (I used the largest pierced circle die) then I ran it through a snowy embossing folder and finally a piece of white glitter card stock 4 1/4 x 1 1/2 cut with the Hills Slimline die 
2.  Using the Pine Tree Slim and Full cut out the snow with white glitter card stock and the tree with dark green card stock.  Using the Merry Christmas w/Deer Family cut out the deer in brown.  I inked the deer with TH Vintage Photo and then colored the hoofs and nose in black.  I also added some small white dots to the fawn

3.  Glue the DP to the card base then glue down the white card stock with the cut out circle

4.  Next glue down the glitter snow bank making sure you do not put glue on the top of the bank so you can tuck in the trees.  Place the full tree first and then tuck the slim one behind it as shown above


5.  Add the deer and Merry Christmas and your card is complete


Thanks so much for stopping by! 

Blessings and Take Care


Saturday, November 30, 2024

Candy Cane Ride

 Hello Friends

Today's post is for the House-Mouse Monday Challenge!  The challenge is Anything Goes or Use a Die.  I decided to go with using a die. The frame is a Pink and Main die and the little peppermints I cut with my Cricut.  The House Mouse stamp is called Sweet Ride.  Check out the fun challenge HERE!


This is such a perfect challenge for using those cute little House-Mouse and Happy Hopper Stamps!  Come and join the fun!

Thanks for taking a peek!
Blessings

Pam

Tuesday, November 26, 2024

Huge Black Friday Sale!!

 Hello Friends

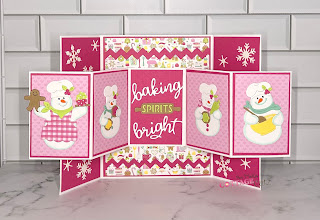
Today, I am featuring one of the adorable dies available in our Black Friday Sale! It is called Baking Spirits Bright The sale is on until December 6th.  The savings are really phenomenal!! Check it out HERE!


Design Steps:

1.  Using the Baking Spirits Bright die cut out the snowmen and senitment in white, yellow, green, teal, pink, brown card stock and pink checked and dotted DP.  (I also added another small snowman as pictured on the card above). Assemble the snowmen with a fine tip glue and set aside

2.  White card base 5 1/2 x 9 1/2, white strip 10 5/8 x 3
3.  Score base horizontally at 1/2 and 2 5/8 flip and score the same on the opposite side
4.  Score strip horizontally at 2 1/8 and 4 1/4 flip and score the same on the opposite side
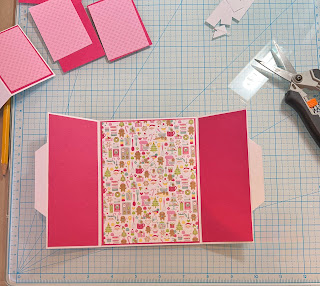
5.  Cut a piece of pink card stock 5 3/8 x 4 1/8 cut a piece of DP 4 x 5 1/4 glue together and then glue on the inside of the card as shown
6.  Cut 2 DP side flaps 1 7/8 x 5 1/4, cut 4 pink pieces of card stock 2 x 5 3/8, cut 4 pieces of pink card stock 2 x 2 7/8 and 4 pieces of heart DP 1 7/8 x 2 3/4.  Glue the heart DP to the smaller rectangles and the Christmas DP to 2 of the larger pink rectangles


7.  Glue the two extra large pink rectangles to the inside flaps as shown above.  Mark the small scored edge 1 1/4 inches from the top and bottom on both sides

8.  Cut away the piece up to the marked line and then give it an angle cut as shown above
9.  Center the folded strip and glue down just the middle sections as shown above

10.  Next add glue to the little side flaps flatten the large strip and glue it down on both sides.  Flip it over making sure you have the little flaps attached to the white strip as shown below
11.  Flip it back over to the inside and glue the small pink rectangles.  Next add the snowmen
12.  For the center panel add the sentiment as shown below then add the rik rak and snowflakes.  Your card is complete

Here is a little video of how it opens and closes!


We have more inspiration on our YouTube Channel check it out HERE

Thanks so much for stopping by! 

Blessings and Take Care


Monday, November 11, 2024

Christmas Poinsettia

 Hello Friends

I have offically started my Christmas cards!  I am lucky I have a few left over from last year so I don't have to make quite as many!  But I am filling my time with some projects for our Church boutique.  The card I am making features the Woodland Christmas Set.


Design Steps:

1.  Use an A2 white card base.  Cut a piece of white card stock 4 1/8 x 5 3/8 and run it through a snowflake embossing folder.  Cut 3 large snowflakes out of glitter card stock using the Crystal Flurry Snowflake die.  Glue the embossed card stock to the front of the card and then add the snowflakes 
2.  Use a white piece of card stock and then blend red and pink ink over the piece
3.  Use a piece of white card stock and blend green inks over the piece
4. Use the Woodland Christmas Set and cut out 3 poinsettia and 6 leaves.  Using the Christmas Floral 2 cut out 5 pine branches
5.  Glue the poinsettia to the front of the card as shown
6.  Add the leaves and the pine branches.  For the Merry Christmas I used the Merry Christmas Ornament and cut out the Merry Christmas.  Add the centers to the poinsettia. I used micro beads called Prills and dyed them yellow.  Your card is complete


We have more inspiration on our YouTube Channel check it out HERE

Thanks so much for stopping by! 

Blessings and Take Care