Saturday, January 20, 2024

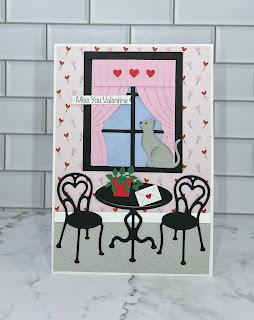
Miss You Valentine

Hello Friends 

It is Pam creating with you today! 

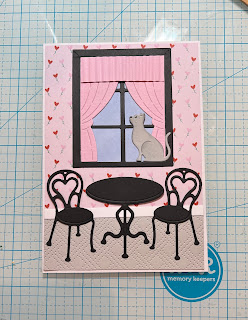
I have another Valentine to share.  I usually send out Valentines to family and a couple of close friends.  So I am just finishing up with a few more.  The one I am showing you today is featuring the Garden Window die from the Black Friday release and an older die Parlor Table & Chairs.  The card is a little larger in size then my typical A2.


Design Steps:

1.  Use a white card base measuring when folded 4 1/2 x 6 1/2, designer paper 4 3/8 x 5 3/8 gray card stock 1 1/2 x 4 3/8 and a white strip 4 3/8 x 1/4
2.  Glue down the designer paper then add gray at the bottom (I ran the gray through a cover plate to get the added texture) last glue down the little white strip
  • Using the Garden Window die and the Parlor Table and Chairs cut them out of black card stock.
  • Using the Garden Window die cut out the cat in gray.  
  • Using the Hanging Pots die cut out the pot in red and the plant in green.  
  • Cut pink card stock for the curtains using the Spring Window with Peekers.  
  • And the last piece is the little envelope which I cut in white with some red hearts the die I used was the Love Letters die.  
  • All the dies I used are still available
4.  Cut a piece of blue card stock for behind the window.  Glue the blue to the back of the window.  Place the curtains in the window.  To make them fit I cut them in the middle and you will also notice they are short so I made a little valence which I ran through my crimping tool
5.  Glue the window to the card front placement as shown above.  Place the cat in the window 
6.  Add the table and chairs as shown above
7.  Add the plant and letter to the table and three little hearts to the valence.  Last place your sentiment and your card is complete


We have more inspiration on our YouTube Channel check it out HERE

Thanks so much for stopping by!  And I will see you next Thursday.

Blessings and Take Care


Saturday, January 13, 2024

7 Favorite Bible Verses

 Hello Friends

Today,  I am making a little desk or table decoration with 7 of my favorite Bible Verses.  This can be folded up and mailed off to a friend.  Or it can just sit on your craft desk with some beautiful encouraging verses.  My inspiration for this project came from a calendar I saw on YouTube. (https://www.youtube.com/watch?v=nHmcrg0gFTo&t=619s ) I am using the Garden Tub & Urn die and the Garden Flowers die both are from the Black Friday release.

Here is a short video to show you exactly how it works

Design Steps:

1.  Using the Garden Tub & Urn die cut out 14 gray tubs.  Stamp the tubs with your favorite verses or quotes
2.  Using the Garden Flowers die cut out the flowers in white twice.  Color with your Copic markers as shown below

3.  For the top little tub I used one pink flower and 2 blue flowers on either side.  For the next tubs I put the red flowers on opposite sides as shown.  Glue the flowers in the pots and then glue the extra blank tub to the back to give it some strength and cover the stems
4.  This is what the first three look like stacked together

5.  For tubs 4, 5, 6, and 7 glue the flowers in as shown above.  Then glue on the extra tubs to the back of each one

6.  The picture above is what they look like stacked with the two tall purple flowers in the back of the pile
7.  This is all of the tubs stacked together.  It makes a really pretty display of flowers

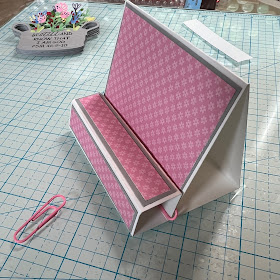
8.  To make the stand for the flower tubs:  Cut a piece of white card stock 11 x 3 1/2.  Score on the 11 inch side at 3/4, 1 1/2, 2 1/4, 3, 5 1/2, 8 1/4
9.  Starting at the 3/4 inch score line making sure you have used a bone folder to really get a good crease begin to roll up the small cube 
10.  Put glue on the bottom flap of the small cube and glue the little cube down
11.  Fold the next crease valley style and the last crease mountain style as shown above
12.  To decorate the base cut 2 pieces of gray 5/8 x 3 3/8, cut 2 pieces of pink DP 1/2 x 3 1/4.  Glue the pink strips to the gray strips.  Cut one piece of gray 3 3/8 x 2 5/8 and cut one piece of pink DP 3 1/4 x 2 1/2.  Glue the pink to the gray
13.  Glue the large piece to the front flap and then glue the to strips on to the top of the cube and one to the front side of the cube
14.  To hold the flap to the little box I used pink paper clips that way if I want to send this in the mail I can take out the paper clips and fold it flat
15.  You can now add your title to the front side of the cube and tuck in the tubs of flowers


We have more inspiration on our YouTube Channel check it out HERE

I would like to wish you all a Blessed New Years and thank you so much for stopping by!


Saturday, January 6, 2024

Vintage Valentine Mailbox

Hello Crafty Friends

I am adding to my Valentine collections.  I send out quite a few so I will probably make mutlitples of this one because it was pretty quick.  I am using the Vintage Mailbox as my main focal point on this card.

Design Steps:
1.  Using the Vintage Mailbox cut out the pieces in pink designer paper, silver and dark gray card stock.  Using Puppy Love Letter die cut out the pieces in cream and pink card stock.  Ink all the pieces in black ink.  Assemble the pieces
2.  Use a dark gray A2 card base, piece of pink card stock 4 1/8 x 5 3/8, piece of designer paper 4 x 5 1/4 and a piece of pink checked designer paper 2 1/2 x 4.  Ink all of the edges in black ink
3.  Glue the designer paper to the pink card stock.  Glue the pink checked piece to the designer paper slightly above center as shown
4.  Glue the gray piece of the Vintage Mailbox to the pink checked paper slightly left of center as shown.  Place dimension dots on the back of the mailbox and then pop it to the grey piece
5.  Glue down the cream envelopes and add the little pink hearts.  Finish by added a sheer ribbon, some heart rhinestones and your sentiment.  Then glue it to the gray card base


We have more inspiration on our YouTube Channel check it out HERE

I would like to wish you all a Blessed New Years and thank you so much for stopping by!


Tuesday, January 2, 2024

Birthday Cards for the New Year

 Hello Friends

I have a few birthdays coming up so I thought I would get started on my 2024 birthday cards.  This one is going to my sister who loves gardening, birds and being outdoors.  I am using two Black Friday release dies called Garden Birds and Trellis Background. I am also using an older die from the Easter release Spring Lillies.  All of theses dies are still available in the online store.


Design Steps:


1.  Start with an A2 white card base,  cut a piece of white card stock 4 1/4 x 5 1/2 and cut out the Trellis using the Trellis Background die.  Glue the Trellis to the front of the card
2.  Use the Spring Lillies die and cut out the pieces in white.  Use your inks to color the flowers and stems (I used TH's Mowed Lawn, Twisted Citron, Mustard Seed and Spiced Marmalade)
3.  Use the Garden Birds die and cut out the pieces in white.  Use your inks to color the bird. (I used TH's Peacock Feather, Black Soot, Hickory Smoke and Blueprint Sketch.  I also used Pink and Main's Fire Engine) For the eye I used a black Glaze Sakura pen and then a white Sukura Gelly Roll pen for the dot in the eye

4.  Glue the flowers down first making sure you have room for the bird.  Glue the bird in place and then add the sentiment


We have more inspiration on our YouTube Channel check it out HERE

I would like to wish you all a Blessed New Years and thank you so much for stopping by!