Sunday, October 29, 2023

Christmas Pup!

 Hello Friends 

Our new Christmas Release is available at a wonderful 30% off.  This collection has over 40 different dies.   It has everything you will need for your holiday paper crafting. Make sure to stop by the online store and check out all the fantastic new designs!

Today, I am using the Christmas Reindeer Puppy.  This little pup is just adorable in his Santa Claus hat and his gift full of his favorite treat!  (This card was inspired by a card I saw on Pinterest created by Yvonne)


Design Steps:

1.  Start with the Christmas Reindeer Puppy die and cut the following colors of card stock: red, white, gray, black, pink and DP green snowflake.  Shade the pups pieces and then assemble with a fine tip glue
2.  Card base is white A2, red cardstock 4 1/8 x 5 3/8, white bazzil 4 x 5 1/4, Green snowflake DP cut with the largest Cross Stitched Circle die (cut the side of the circle as shown above), glitter silver strip with a bevel edge 3 1/2 x 1/4, gray cut with a dovetail 3 1/4 x 3/4, red cut with a dovetail 4 x 3/4, white cut with a bevel edges 3 5/8 x 1 and DP checked cut like an arrow 3 3/8 x 1 3/8
3.  Glue the red to the card base then add the white.  Glue the circle to the right side of the card as shown
4.  Add all the strips in this order: red, gray, white, plaid and then glitter silver.  Place dimension squares on the back of the pup and pop to the card as shown in the first top picture
5.  Using the Snowflake Set and the Merry Christmas Love dies cut out 3 snowflakes in white glitter card stock.  Stamp your sentiment and add to the card as shown below and it is complete


We have more inspiration on our YouTube Channel check it out HERE

Thanks so much for stopping by!  And I will see you next Thursday.

Blessings and Take Care


Wednesday, October 25, 2023

Collaboration Insta-Hop CottageCutz and La-La Land Crafts

 Hi Crafty Friends! 

We’re so excited you’ve joined us for a Collaboration Insta-Hop with La-La Land Crafts and CottageCutz! We’ve got some amazing inspiration from both talented design teams PLUS both companies will be giving away $50 PRIZES! 

WHAT DO YOU HAVE TO DO TO BE ENTERED TO WIN?? Just leave a comment at each stop in our lineup by Nov. 2, 2023 at 11:59 PM EDT. Winners will be announced on the @lalalandcrafts & @cottagecutz IG accounts on 11-4.23! The instagram hop starts HERE.

My card features Pile of Fun Stamp Set from La-La Land Crafts plus Fall Gate w/Flowers and Fall Trees from CottageCutz


Click on the picture below to start the hop!


Hope to see you at this fun collaboration hop!

Blessings
Pam

Sunday, October 22, 2023

Swing into Fall

 Hello Friends 

It is time to show off our new RELEASE!  It is our Fall Designs for 2023.  Perfect for those Thanksgiving cards and fall birthdays. The new dies are in the online store.  There are 15 designs and they are currently 30% off! 

I am sharing a card using the Fall Branch w/Swing and Autumn Friends


Design Steps

1.  For the base use a cream A2 size. Using largest Wide Pierced Retangle Frame die cut out 2 in teal,  cut a piece of leave rust DP 4 1/8 x 5 3/8 and use a piece of cream cut to fit inside of the rectangle frame 3 1/4 x 4 1/2.  Use some teal ink and blend it on the cream colored rectangle
2.  Glue the leave DP to the card base.  Glue the two teal frames together and then add dimension tape to the back of the frame.  
3. Glue the inked paper to the center of the card and then pop the frame over the top
4.  Using the Fall Branch w/Swing and the Autumn Friends die cut out the following colors of card stock: rust, cream, teal, yellow, brown, and dark brown
5.  Place some dimension squares to the back of the branch and swing.
6.  Pop the branch and swing to the card as shown.  Add dimension dots to the back of the little fox and then pop him onto the swing.  Add the leaves to the tree branch and a few to the bottom of the frame.  Stamp your sentiment then layer onto yellow.  Glue the sentiment to the frame as shown below and your card is complete


We have more inspiration on our YouTube Channel check it out HERE

Thanks so much for stopping by!  And I will see you next Thursday.

Blessings and Take Care


Friday, October 20, 2023

It is Count Mousecula!

 Hello Friends

Today's post is for the House-Mouse Monday Challenge!  The challenge is Anything Goes or add a House Mouse friend.  I decided on anything goes.   To Check out this challenge clip HERE!


This is such a perfect challenge for using those cute little House-Mouse Stamps!  Come and join the fun!


Thanks for taking a peek!

Blessings
Pam

Saturday, October 14, 2023

Pocket Fun

 Hello Friends 

Our new Christmas Release is available at a wonderful 30% off.  Make sure to stop by the online store and check out all the fantastic new designs!

Today, I am using the Ginger Pocket Peeker.  This little gingerbread man is just adorable in his Santa Claus hat!

I am following along with this weeks Color Challenge over at SplitcoastStamper:  The colors are Real Red,  Pool Party, Old Olive and Lemon Lolly.  (I also used navy which is considered a neutral)


Design Steps:

1.  Using the Ginger Pocket Peeker cut out the following colors of card stock: Navy, Pool Party, Real Red, Tan, White and Old Olive.  Use coordinating inks to shade the pieces and then assemble with a fine tip glue
2.  The base is an A2 size with the following: 4 1/8 x 5 3/8 red, 4 x 5 1/2 red polka dot, 2 Lemon checked columns 3 x 1 and layered on red, second to the largest Stitched Scallop circle in white, and red scalloped retangle measuring 1 3/4 x 5 1/2
3.  Glue the red polka dot paper to the solid red card stock.  Glue the scalloped rectangle to the center of the card.  Next glue the yellow columns about 1/2 inch from each side centered on the card  
4.  Add the scalloped circle to the center of the columns as shown above.  Place dimension squares to the back of the seeker.  And then pop him to the center of the circle
5.  Add glitter snowflakes and your sentiment and your card is complete


We have more inspiration on our YouTube Channel check it out HERE

Thanks so much for stopping by!  And I will see you next Thursday.

Blessings and Take Care


Sunday, October 8, 2023

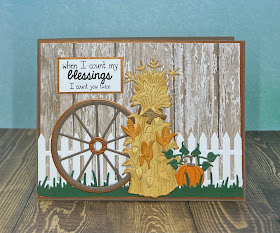
Counting Your Blessing

 Hello Friends 

It is time to show off our new RELEASE!  It is our Fall Designs for 2023.  Perfect for those Thanksgiving cards and fall birthdays. The new dies are in the online store.  There are 15 designs.  

I am sharing a card using the Fall Wagon Wheel and the Harvest Cornstalk.


Design Steps:
1.  Using the Harvest Cornstalk, Picket Fence Border, Spring Grass and the Fall Wagon Wheel cut out the following colors of card stock:  white, brown, yellow, orange yellow, orange, green and copper.  Shade the cornstalk with TH vintage ink.  Then assemble the pieces with a fine tip glue
2.  For the card base use an A2 brown piece of card stock, 4 1/8 x 5 3/8 piece of copper card stock and a 4 x 5 1/4 piece of wood DP
3.  Glue the copper piece to the brown card base and then add the wood DP.  Glue the fence down and then add the grass
4.  Place the wagon wheel to the left and then add dimension dots to the back of the cornstalk and pop it on next to the wheel
5.  Last add the pumpkin, vine and then the sentiment.  Your card is complete


We have more inspiration on our YouTube Channel check it out HERE

Thanks so much for stopping by!  And I will see you next Thursday.

Blessings and Take Care