Monday, January 25, 2021

Galloping By!

 Hello Scrapping Cottage Friends

I just love horses and so do many people especially little girls.  I could not resist making a card that showcased this beautiful Circus Pony.  I decided to use Valentine colors so that this could either be a February birthday, a Valentine or just a Hello.  


Design Steps:

1.  Use an A2 cream card base, silver card stock 4 1/8 x 5 3/8, and striped red DP 4 x 5 1/4.  Using the Stitched Scallop Rectangle die cut a silver rectangle using the second for the largest die and a cream colored rectangle using the third from the largest die
2.  Using a variety of card stock colors, as shown above,  and the Prancing Pony die cut out the Pony.  Shade the pony using a few different shades of ink then assemble the pony using a fine tip glue
3.  Prepare the base by adhereing the silver card stock to the card base, next add the striped DP.  Add pop dots to the back of the silver rectangle and stick to the striped DP.  Last add the cream colored rectangle to the center of the silver rectangle
4.  Use pop dots to place the pony and then stamp and layer the sentiment and glue flat.  You card is complete and ready for a number of different occasions 

CottageCutz Products
I want to thank you for stopping by today!  We have so many fantastic dies in the store make sure to check them out by clicking HERE!

Blessings and Take Care
Pam


Wednesday, January 20, 2021

Birthday Clown

 Hello Friends

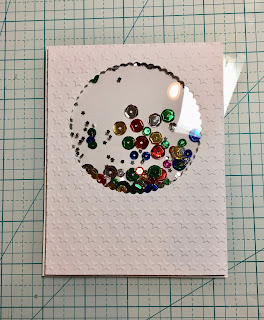
Today,  I am continuing to make my 2021 cards.  And I wanted to do a shaker so I decided to use the happy little clown with the handful of balloons to create a fun birthday card.


Design Steps:

1.  Use a white A2 card base cut a piece of white card stock 4 x 5 1/4 and then use the second from the largest Scallop Circle die to cut out the opening for the shaker.  After cutting out the hole run it through a star embossing folder.  Line the hole with double sided tape and then place a 4 x 4 piece of acetate on the tape
2.  Circle the hole with double sided foam tape add the sequins and little stars.  Add additional foam around the bottom of the card also 
3.  Cut another piece of white card stock 4 x 5 /4 and place it directly over the piece with the shaker window and then mount it to the card base
4.  Use the Clown with the Balloons die and cut out the pieces in red, blue, green, yellow, tan, white and orange card stock
5.  Using a fine tip glue and tweezers assemble the little clown with his balloons
5.  Using Happy Birthday Expressions cut out Happy Birthday twice and glue together.  Then adhere the sentiment to the front of the card
6.  Pop up the clown to the card front and the Birthday card is complete

CottageCutz Products


Thanks so much for stopping by today!  I hope you get a chance to pop into our online store and check out this latest release!  It is super fun!!

Blessings
Pam


Sunday, January 17, 2021

Circus Birthday!

 Hello Friends

I have three little ones to make cards for and they love bright happy cards.  So this fun new release fits the bill! It just screams vibrant colors especially the wonderful primary colors.  Today, I have used 5 of the new dies to make this cute side step card.  

Here is my card to share with you today!


I started my card by cutting all of the pieces out using the Leaping Lion, Balancing Elephant, Circus Tent, Circus Side Show and Circus Signs.  Assemble them and then make your side step base.  Use some cloud DP and green card stock to cover the base.  

Glue the pieces to the base arranging them as you wish and your card is complete.


CottageCutz Products


Thanks so much for stopping by today!  We love visiting with you!
Blessings
Pam


Sunday, January 10, 2021

Bananas for You


Hello Everyone

So excited to share this wonderful Circus collection with you today.  I must say it was a sad day when Barnums and Bailey Circus went into the history books.  It certainly was a form of entertainment in the days gone by.  The new release has 16 bright, happy and detailed dies.  They are on a special bundle price right know in the online store.  Just click this highlight store to check them out.

The dies can be used for just about anything from a kids birthday, fun thank you or a Valentine like I am showing today. 


Design Steps

1.  Using the Juggling Monkey die cut out the pieces with Kraft, tan, yellow, red and blue card stock
2.  Shade the pieces and assemble them using a fine tip glue
3.  Use a A2 white card base, cut a piece of corrugated kraft card stock 4 x 5 1/4, cut 3 strips of DP with hearts 1 1/2 x 3 3/4 and last cut a piece of white card stock with the 2nd from the largest Pierced Rectangle die
4.  Glue the corrugated kraft card stock to the front of the white card base.  Equally lay out the DP hearts paper across the corrugated kraft card stock as shown and glue down.  Pop the white rectangle up using dimension tape.  Add the Juggling Monkey, bananas and the sentiment.  To Finish add the twine

CottageCutz Products


Thanks so much for stopping by today!  We love seeing you here and don't forget to leave a comment and check out this fabulous new release!

Blessings
Pam


Monday, January 4, 2021

Sunset Sympathy

Hello Scrapping Cottage Friends

It is Pam sharing with you on the blog today!

I am making a variety of cards to start off the new year to refill my card stash.  And the one card I always have trouble making is a sympathy card especially when it is needed right away.  So I thought I would make a few a head of time so if needed it won't be do difficult.  I am using two dies from the Safari release the Savanna die and the Safari Watering Hole.  I thought they made a very peaceful scene for a sympathy card. 

Design Steps:
1.  Cut all of the pieces in black using the Savanna die.  I only used the smaller tree, a piece of grass and the birds for this card


2.  Assemble the tree using a fine tip glue and using the Safari Watering Hole die cut out the animals in black card stock

3.  Cut a piece of white card stock 4 x 4 and select your inks to create your sunset.  I cut a circle to mask the sun using the 4th from the largest Pierced Circle die.  First ink 3/4 of the white card stock with the lightest yellow.  Then place down your mask for the sun.  Next ink with the darker yellow working around the mask.  Select your orange ink and ink just to the edge of the darker yellow and last add your red along the edges of the paper.  For the bottom I ripped a Post It note and masked off the ground first the heavier black then moved the mask and used a lighter touch for the top black
4.  Cut a piece of white card stock 4 x 5 1/4 and then cut a circle in the center slightly toward the top.  I used the second from the largest Pierced Circle die.  Stamp your sentiment on the bottom and add a couple of score lines.  Use an A2 black card stock base.  Glue the sunset to the back of the white card stock with the circle cut out then portion onto the black card base.  Add the tree and the animals and your card is complete
CottageCutz Products


I hope you get a chance to relax and enjoy making some crafty thing whether it is cards, mini albums or scrapbooking!
Blessing
Pam